1-01: RStudio Projects Setup
0.1 To do
- Include checklist
1 Purpose
Install and test the software you will need for this class
Provide a basic overview of how RStudio works and its relationship to R
Execute, using the Source button, an R script
Show how commenting works and the importance of commenting
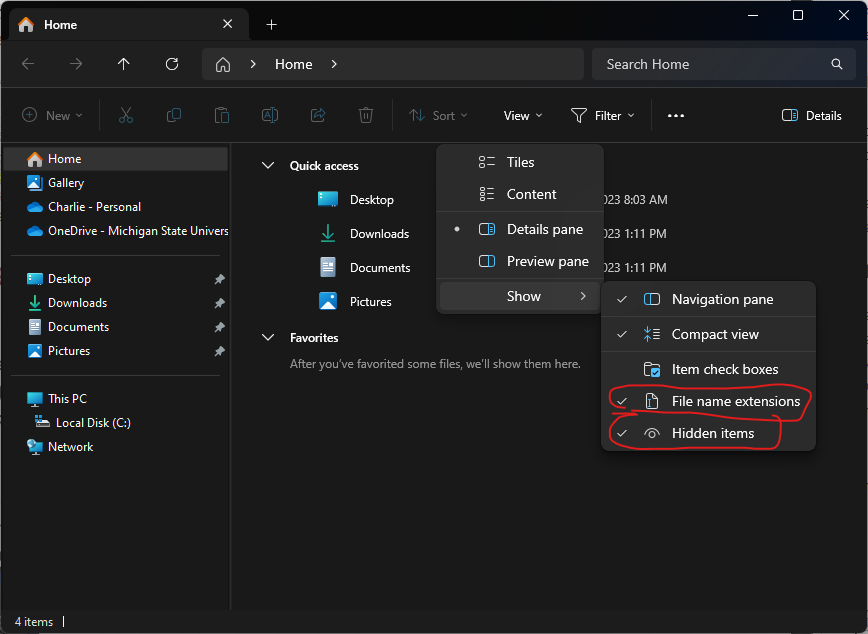
1.1 Special note about images in the lessons for this class
RStudio is a rapidly evolving program, and it would be too much work to maintain all the images so that they reflect the newest version of RStudio and its visual likeness. Some of the images in this class reflect older versions of RStudio and there are minor changes that I have made to the code that I did not believe warrants putting in new images. I have tried to make sure these differences change nothing functionally. Inevitably, something will fall through the cracks – so please, contact the instructor if there is a problem!
2 Questions about the material…
If you have any questions about the material in this lesson, feel free to email them to the instructor, Charlie Belinsky, at belinsky@msu.edu.
4 Install R and RStudio on your computer
We are going to install R and RStudio on your computer. R is a programming language and RStudio provides a structured environment for the R programming language, similar to the way Microsoft Word provides a structured environment for document editing. RStudio is patterned on other popular programming environments like Microsoft’s Visual Studio.
On Windows the default installation can be used for R and RStudio. For Mac, installation is a bit trickier – details below.
Note: Even if you already have the software installed, it is a good idea to verify you have a recent version.
4.1 Install or update R (need version 4.4 or higher)
The R for Windows download is here. Click on Download R 4.#.# for Windows.
The R for Mac download is here.
There are two versions of R for Mac
R-4.#.#-arm64.pkg: for Macs with Apple-based processors (M1, M2, M3…), all Macs from 2021 on use Apple-based processors
R-4.#.#.pkg: for older Macs with Intel-based processors
The installer will tell you If you pick the wrong pkg file – there is no harm except a bit of wasted time.
And for those of you using Linux – the R for Linux download instructions are here.
4.2 Install or update RStudio
You need version 2023.12 or higher for this class and you should have 2025.04 or higher if you are using Git.
You can download the RStudio Installer here. Download the appropriate file for your computer under Installers, open the file, and use the default installation options.
4.2.1 Special instructions for Mac users
For Mac users there are some extra complexities:
You might be asked to install Command Line Developer Tools while installing RStudio. Go ahead and install the developer tools.
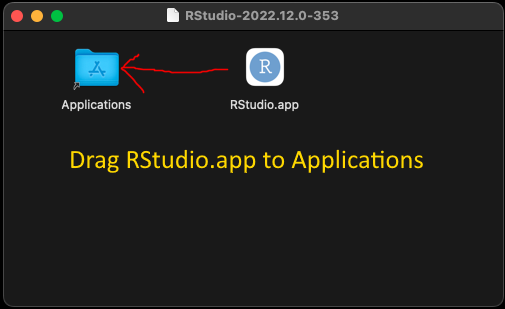
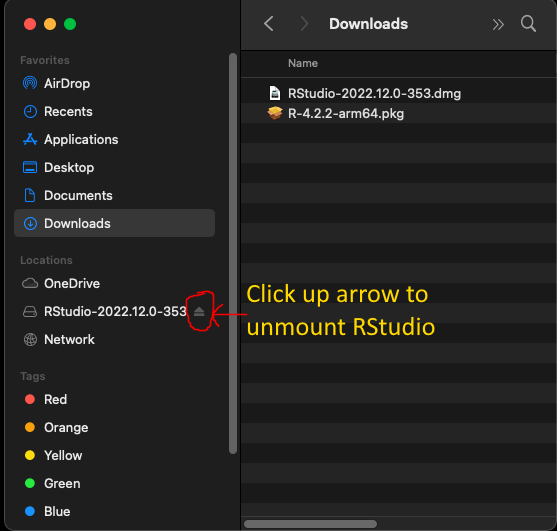
The download for RStudio is called RStudio-202X.XX.dmg. Double-clicking the file will open the window below (Figure 4). In the window, drag the RStudio file to the Applications folder
If you already have RStudio installed, you will be asked if you want to replace the old version – go ahead and Replace it.
- After installation, unmount the RStudio device in the Finder by clicking the eject button (Figure 5)
5 Installing a package
GGPlot2, is a widely used package that does not come with R or RStudio – so we are going to install the GGPlot2 package using RStudio.
To install the package GGPlot2 using RStudio (Figure 6):
- Click Tools -> Install Packages…
- In the Install Packages window, type GGPlot2 in the Packages textbox
- Click Install
GGPlot2 requires many other packages (its dependencies) – and RStudio will install those packages along with GGPlot2. Be patient, as this could take a little time.

6 RStudio Projects and Project Folders
Most of the work you will do in R involves multiple scripts, data files, and perhaps other types of files. All these files together make up your project and they exist within a Project Folder, which is the folder on your computer than contains all the files and subfolders for your project – and it is very important that you keep all files associated with a project within a Project Folder.
In this class we will be using RStudio to create, edit, and execute R scripts. In RStudio, there is a feature called RStudio Projects, which is a Project Folder, that makes it much easier to move, share, and host your project on GitHub. You need to keep all of your class work in an RStudio Project.
6.1 Create a new RStudio Project
To create a new RStudio Project, which is also your project folder:
open RStudio
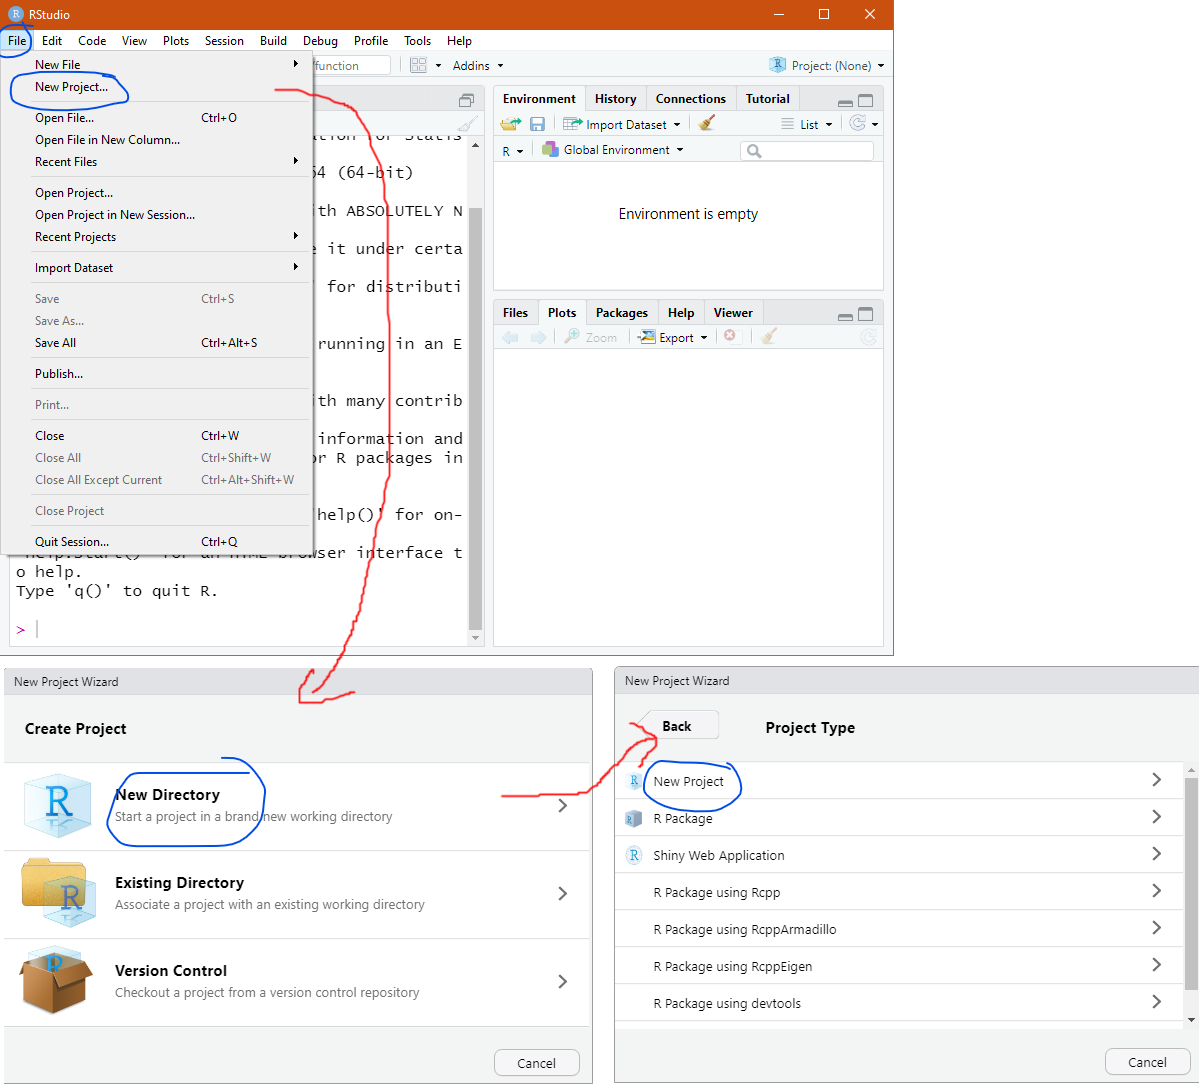
click File -> New Project
In the Create Project window click New Directory
In the Project Type window click New Project
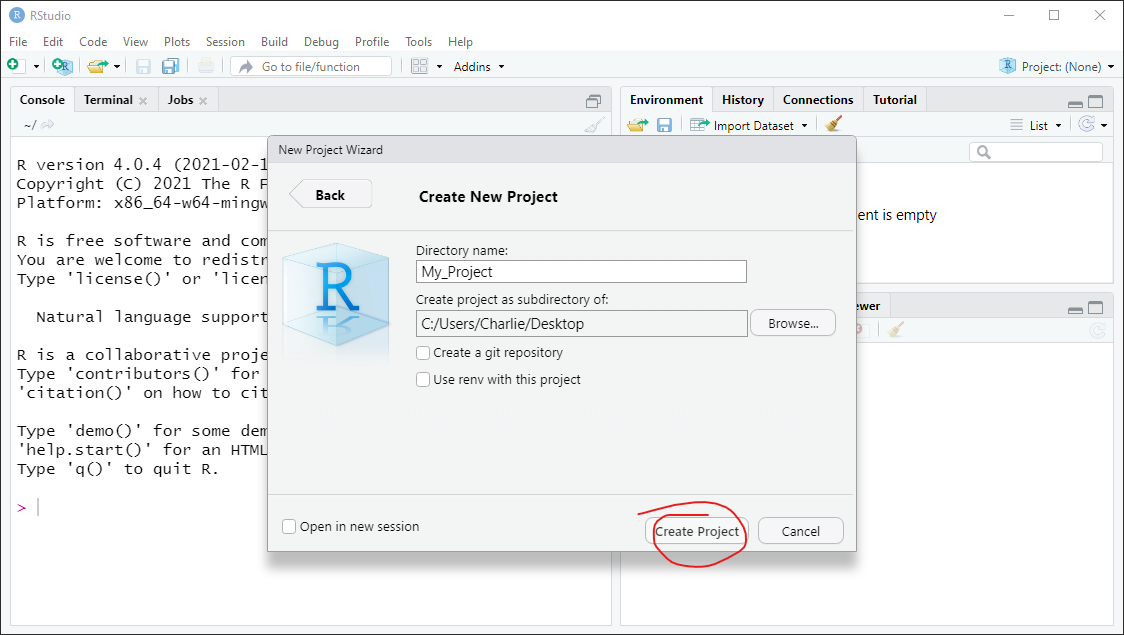
In the Create New Project window:
The Directory name is the name of the Project Folder that will contain your whole RStudio Project
The Project Folder will be created in the folder listed in the second textbox (Create project as subdirectory of:)
In Figure 8, the Project Folder is named My_Project and is in the Desktop folder. Note: you can name the folder whatever you want and put it in any folder location.
6.2 RStudio Project Files Tab
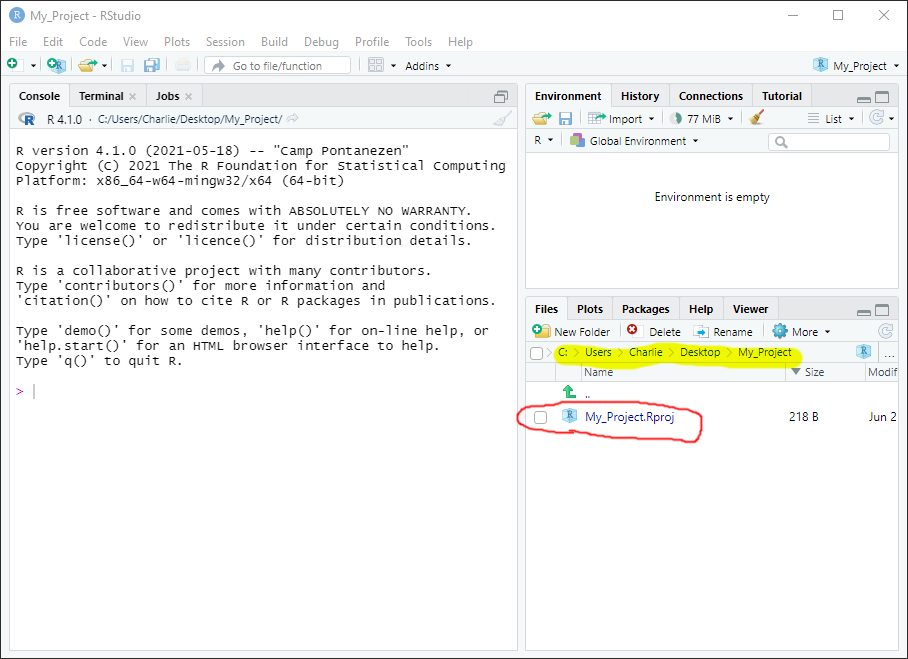
The Files tab (bottom-right corner) in RStudio is a File Manager, and it allows you to do many things that you can do in your operating systems File Manager (called File Explorer in Windows and Finder in Mac). The Files tab can be used to open, add, remove, or rename files and folders. When we first create the RStudio Project, the Files tab will be set to the Project Folder (Figure 9, C:/Users/Charlie/Desktop/My_Project) and there is one file in the folder: My_Project.Rproj.
Whenever you create an RStudio Project, an .Rproj file is added to the Project Folder. This main purpose of this file is to designate this folder as the working directory for your project. Double-clicking on the .Rproj file in your File Manager will open your Project in RStudio (just like double-clicking a .docx file opens the file in Word).

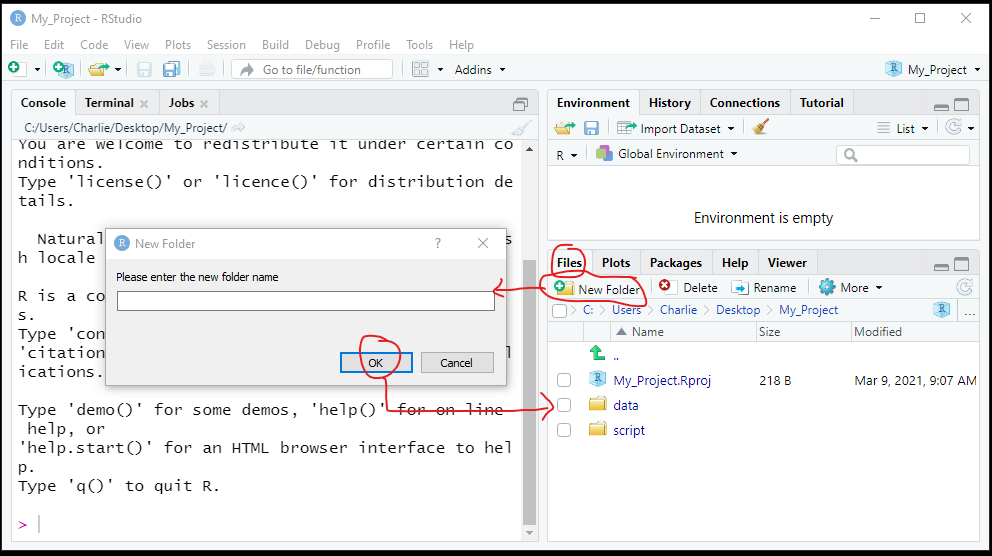
6.4 Add Subfolders
We will use the Files tab in RStudio (bottom-right tab) to create two subfolders: scripts and data.
To add two folders named scripts and data:
Click on New Folder in the Files tab
Enter scripts in the textbox and click OK
Repeat the last two steps to add a folder called data
6.5 Add files to the project
We are going to download two files and add them to your new RStudio Project.
RSProj_Setup.r: put this file in your scripts directory
RSProj_Setup.csv: put this file in your data directory
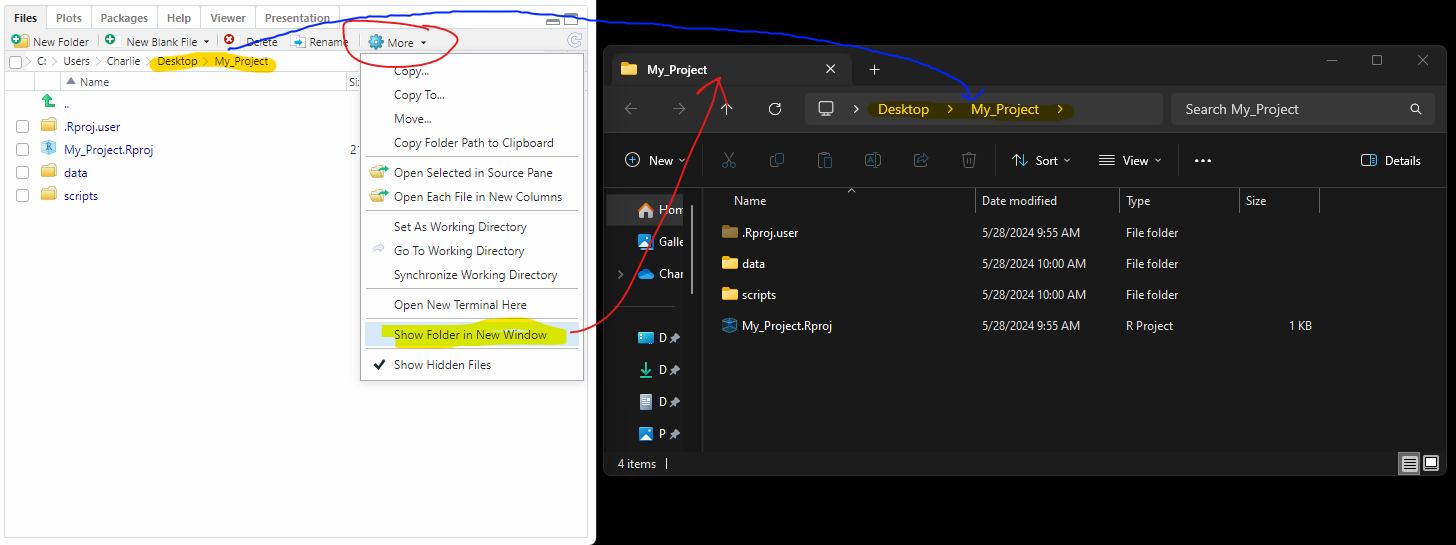
6.6 Opening File Manager from Files tab
The Files tab can do a lot of things that File Explorer/Finder can do – but not everything. For instance, you cannot drag and drop files in the Files tab like you can in File Explorer/Finder.
You can open up a File Explorer/Finder window to the same folder by clicking More… -> Show Folder in New Window.
6.7 RStudio Project File Manager
You should now be running RStudio, opened to the RStudio Project that you just created. If you click on the Files tab in the lower-right corner, you will see all the folders and files within your RStudio Project (linked to your Project Folder). You will also see your project name in the upper-right corner (in this case, My_Project).
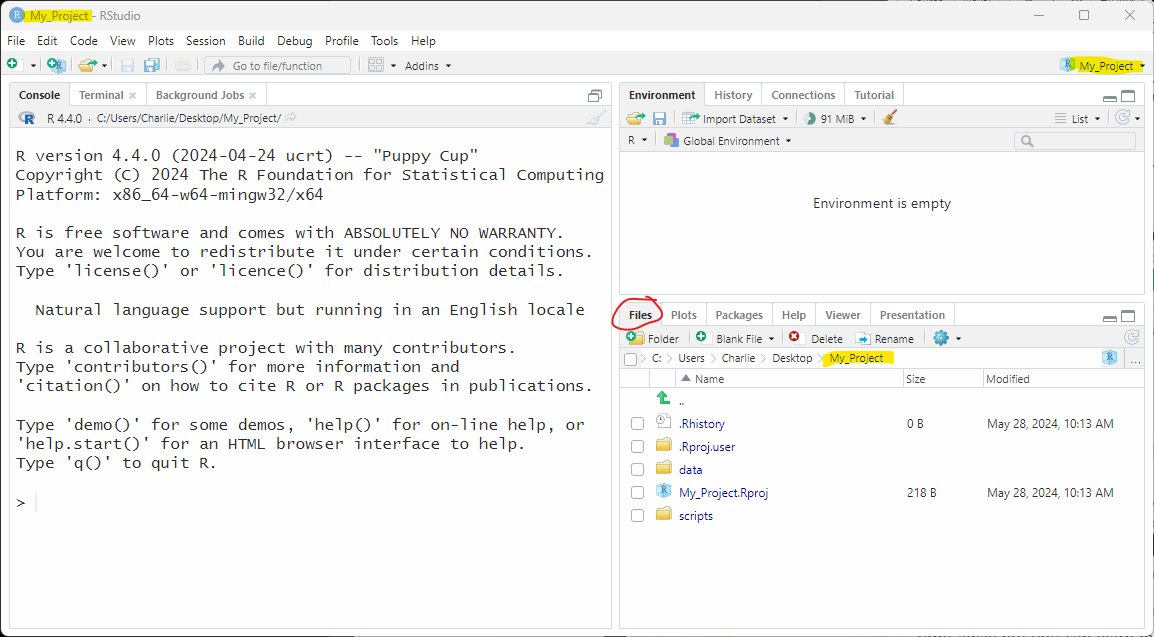
The *.RProj files is here and you might also see a file named .RHistory. These are not files you will need to use right away but you can learn more about them at Extension: *.RProj and .Rhistory.
7 RStudio Basics
Now we are going to execute the script file, RSProj_Setup.R, that we just downloaded to your RStudio Project’s scripts folder.
RSProj_Setup.R takes weather data from the other downloaded file, RSProj_Setup.csv and creates boxplots showing how Wind Direction and Wind Speed relate to the Change In Temperature.
We are executing the script to test your setup and help you become familiar with the RStudio environment. If you are taking the GGPlot class, the code in RSProj_Setup.R is something you will learn throughout the course. For this lesson,
7.1 Open your RStudio Project
There are multiple ways to open an RStudio Project – three of them are:
Open your Project Folder in File Explorer (Windows) or Finder (Mac) window and double-click the <Project_Name>.Rproj file
In RStudio, click File -> Open Project… -> navigate to the Project Folder and click the *<Project_Name>.Rproj file
In RStudio, click File -> Recent Projects -> choose the RStudio Project you just created
7.2 Open a script file in your Project
To open the script file either:
In Files tab, go to the scripts folder and click on RSProj_Setup.R or
In RStudio click File -> Open File -> and then find RSProj_Setup.R in the scripts folder and click Open.
After opening the script file, you should see something that looks like this (Figure 14) on your screen:
The script will only execute if it is opened inside your RStudio Project.
7.3 Setting up RStudio tabs for scripts
When we are editing and executing an R script, we generally have the following RStudio tabs open (Figure 15):
File Viewer – text viewer and editor for the opened script files (upper-left corner)
Console – displays information about the execution of your script file (lower-left corner)
Environment – displays data points, or variables, from the execution of your script file (upper-right corner)
Plots – plots produced by the execution of your script file are displayed here (lower-right corner)
The fourth (lower-right corner) tab is on Files, so we switched the tab to Plots:
Note: the Help tab in the lower-right corner is something you might find useful. Extension: The Help Tab
7.4 Common buttons used in RStudio
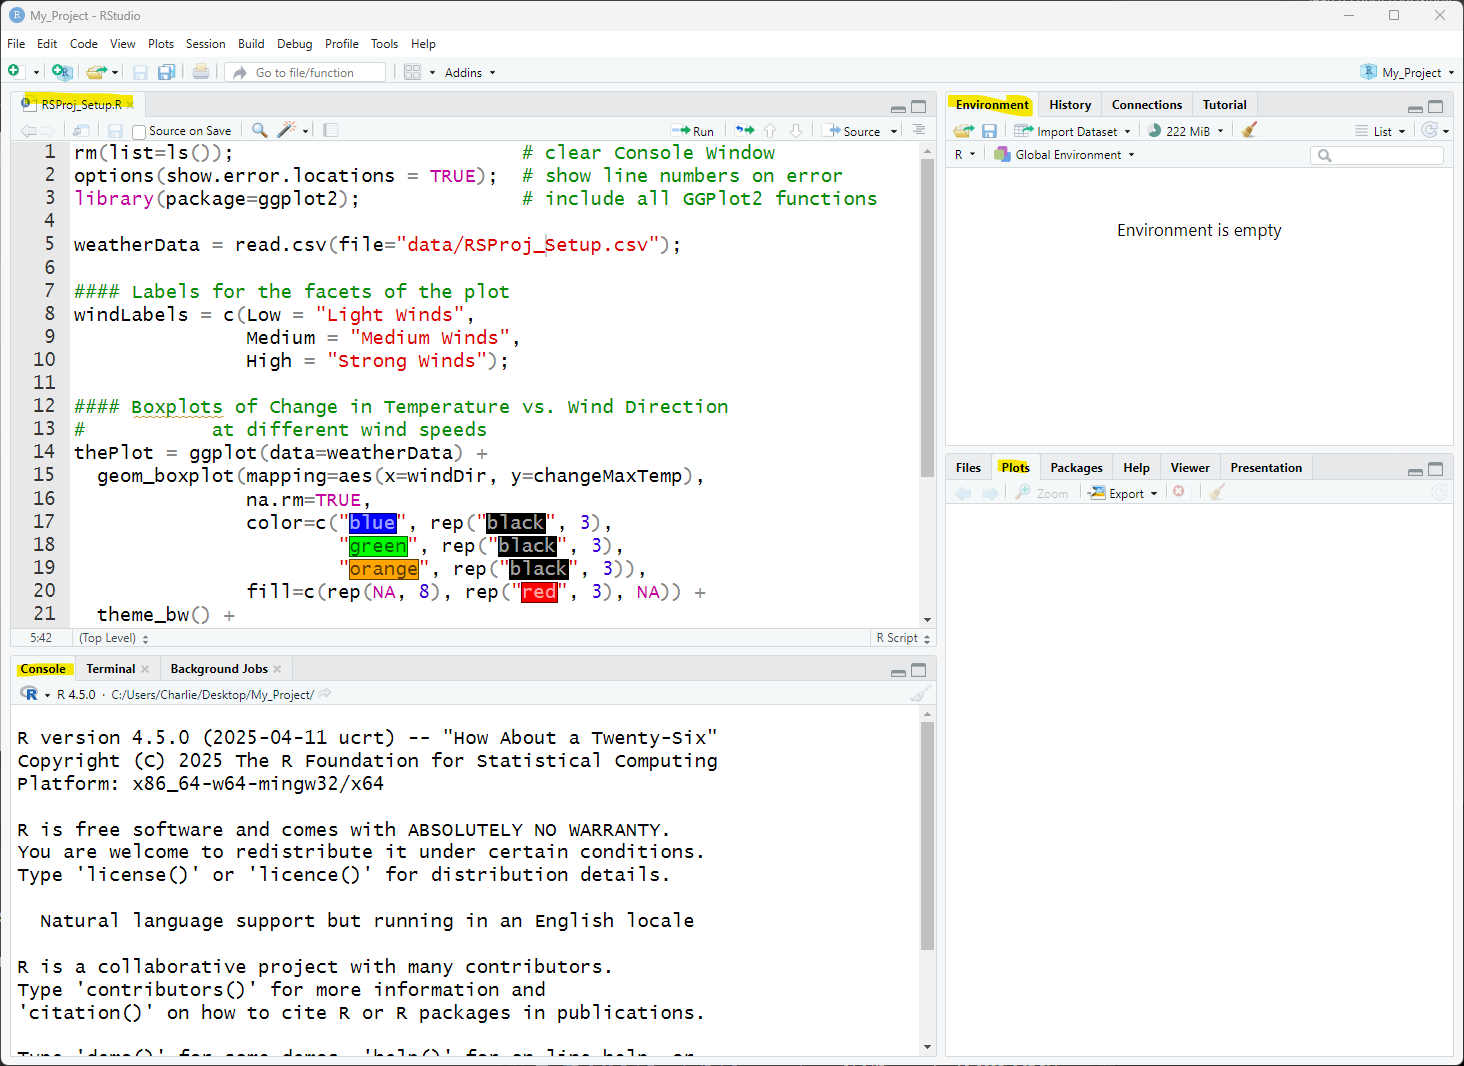
The script file, RSProj_Setup.r, is a fully functioning script that takes temperature and wind data from the Comma Separated Value (CSV) file, RSProj_Setup.csv, and plots out the data. I am going to use this program to demonstrate a few of the useful buttons in RStudio.
The one button you will use most in R is Source, which executes your whole script. Press the Source button to execute the script (Figure 16).
Note: If you have already used R, there is a good chance you highlight lines of code and click Run to execute just those lines. We are not using this method in this class. For this class, you should always use Source to execute your code. For more information go to Extension: Run vs. Source
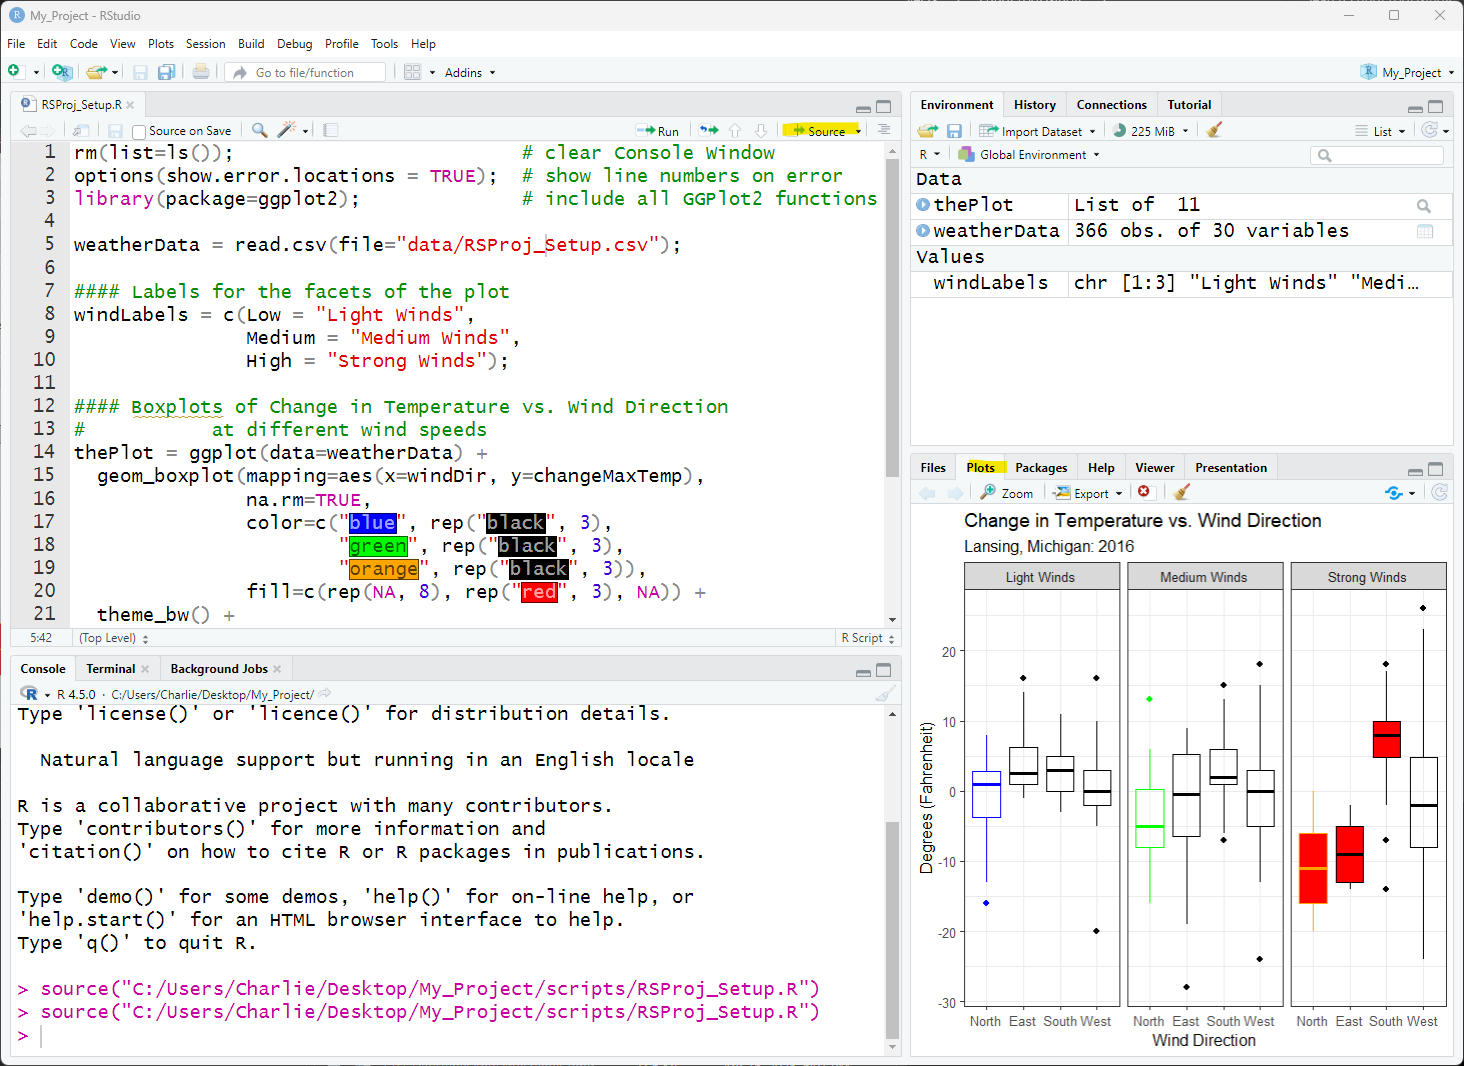
After the script is run:
The Environment tab displays values for the data (variables) in the script (e.g., weatherData, windLabels).
The Console tab displays information about the execution of the script.
The Plot tab displays the box plots. If there are multiple plots, you can use the arrow buttons to switch between the plots.
7.5 Cleaning up the RStudio windows
There many times where you want to clean up the windows, which can get very crowded with information from old script executions.
- To clean the Environment, Plot, and Console tabs use the brush button (Figure 16).
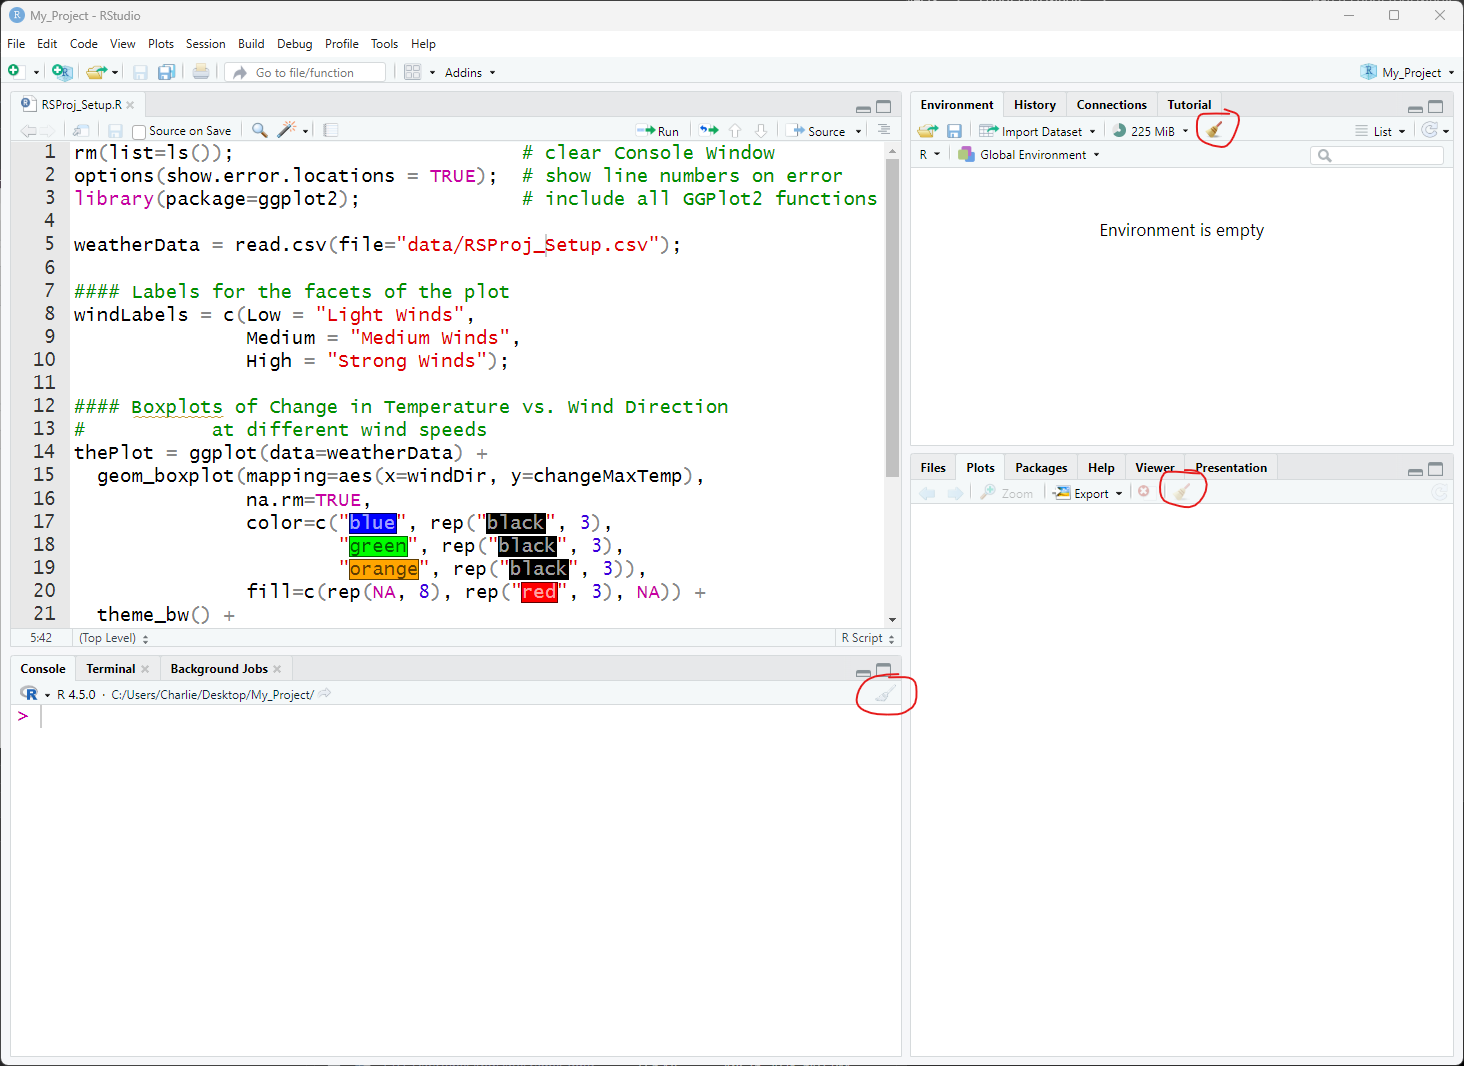
If you click Source again, the Environment, Plot, and Console tabs will once again be populated with data from the script.
8 Application
In your RStudio Project, create a new script file (File -> New File -> R Script)
Copy and paste this lesson’s script, RSProj_Setup1.r, to the new script.
Change the colors in the boxplot (edit lines 17-21)
- Here is a comprehensive list of color names you can use in R
Save the script as app01.r, and to your script folder
Save the script as app1-01.r in your scripts folder and email your Project Folder to Charlie Belinsky at belinsky@msu.edu.
Instructions for zipping the Project Folder are here.
If you have any questions regarding this application, feel free to email them to Charlie Belinsky at belinsky@msu.edu.
8.1 Questions to answer
Answer the following in comments inside your application script:
What was your level of comfort with the lesson/application?
What areas of the lesson/application confused or still confuses you?
What are some things you would like to know more about that is related to, but not covered in, this lesson?
8.2 Zip your Project Folder
In your File Manager (not in RStudio), right-click on the Project Folder and in:
Windows 10:
Click Send to
Click Compressed (zipped) folder
Windows 11:
- Click Compress to Zip file
Mac:
- Click Compress “<Project Folder>”
For all operating systems, a zipped file named <Project Folder>.zip with all the Project Folders’ contents is created in the same folder. You can email the zip file.
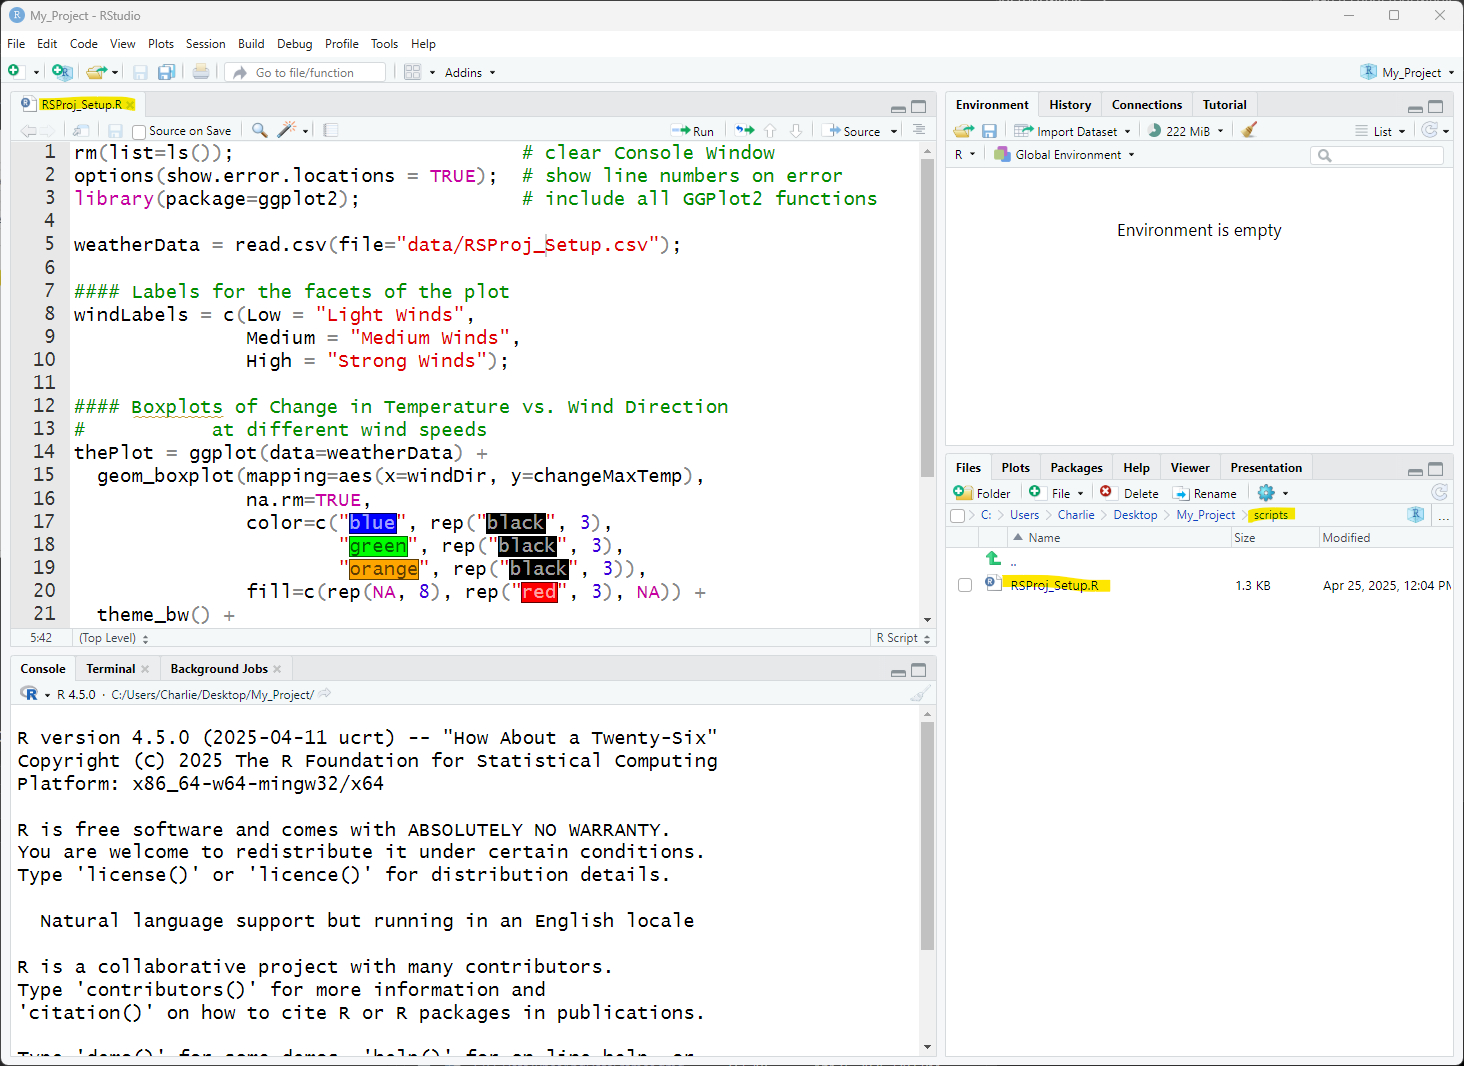
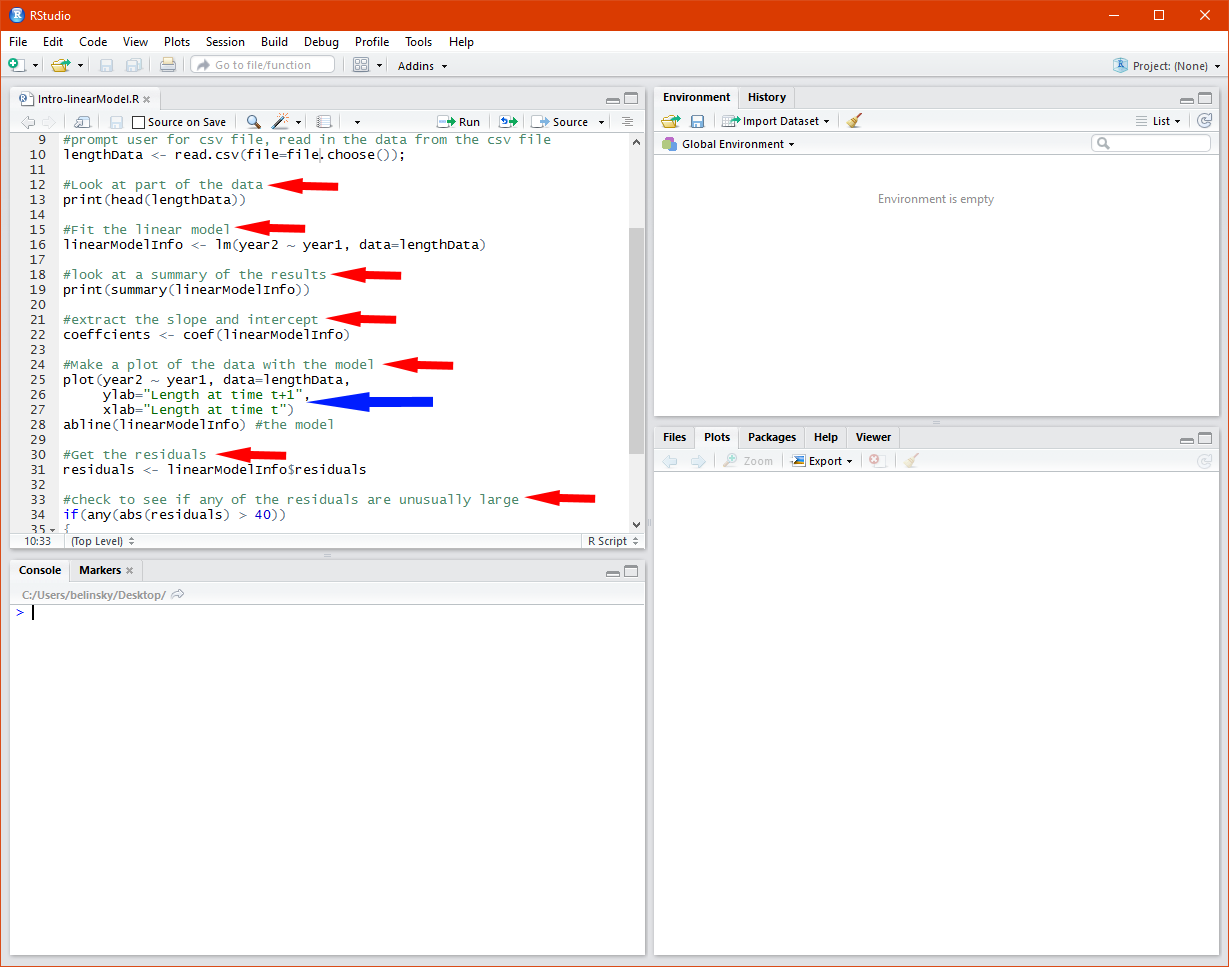
9 Extension: Color Schemes
I am not a big fan of the default color scheme in RStudio. It does not create enough differentiation between the different components of a script. For instance, comments (red arrows) are in green and quoted items (blue arrows) are in just a slightly different green (Figure 18).
9.1 Changing the color scheme
A good color scheme can really help a programmer by allowing them to quickly identify parts of a script and common errors, like misplaced quotes.
RStudio offers many color schemes – you can change the color scheme by:
clicking on Tools in the main menu (circled in Figure 19)
choose Global Options
When the Global Options window open (in Figure 19), click on Appearance
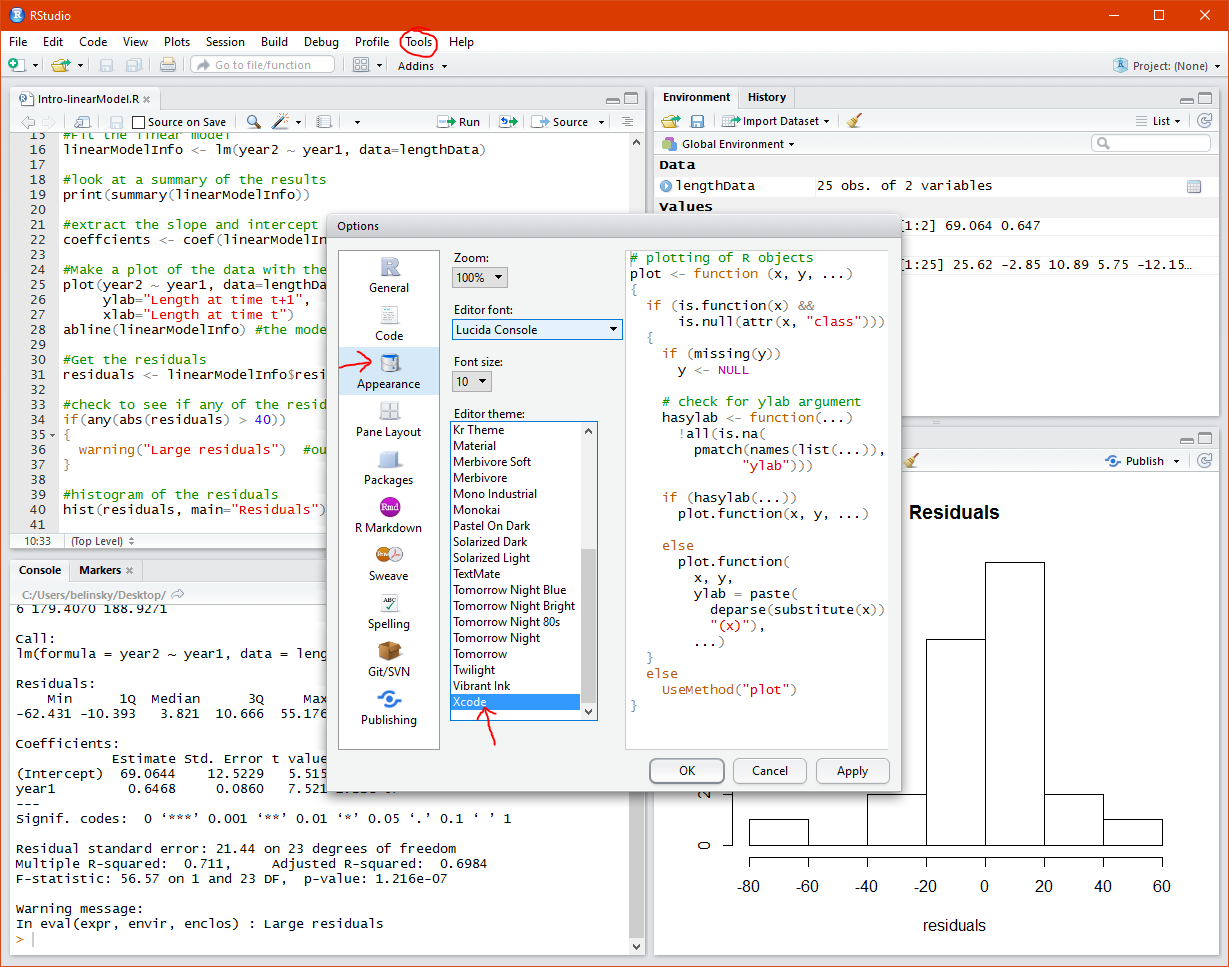
The image above shows the Xcode color scheme ( Figure 19). I prefer Xcode because it does a good job differentiating the different aspects of the script. Notice how the comments (in green) are now clearly distinguished from the quotes (in red).
You can choose from around 20 themes in the Editor theme window and you can change the theme anytime without affecting anything else.
9.2 Adding more color to differentiate output
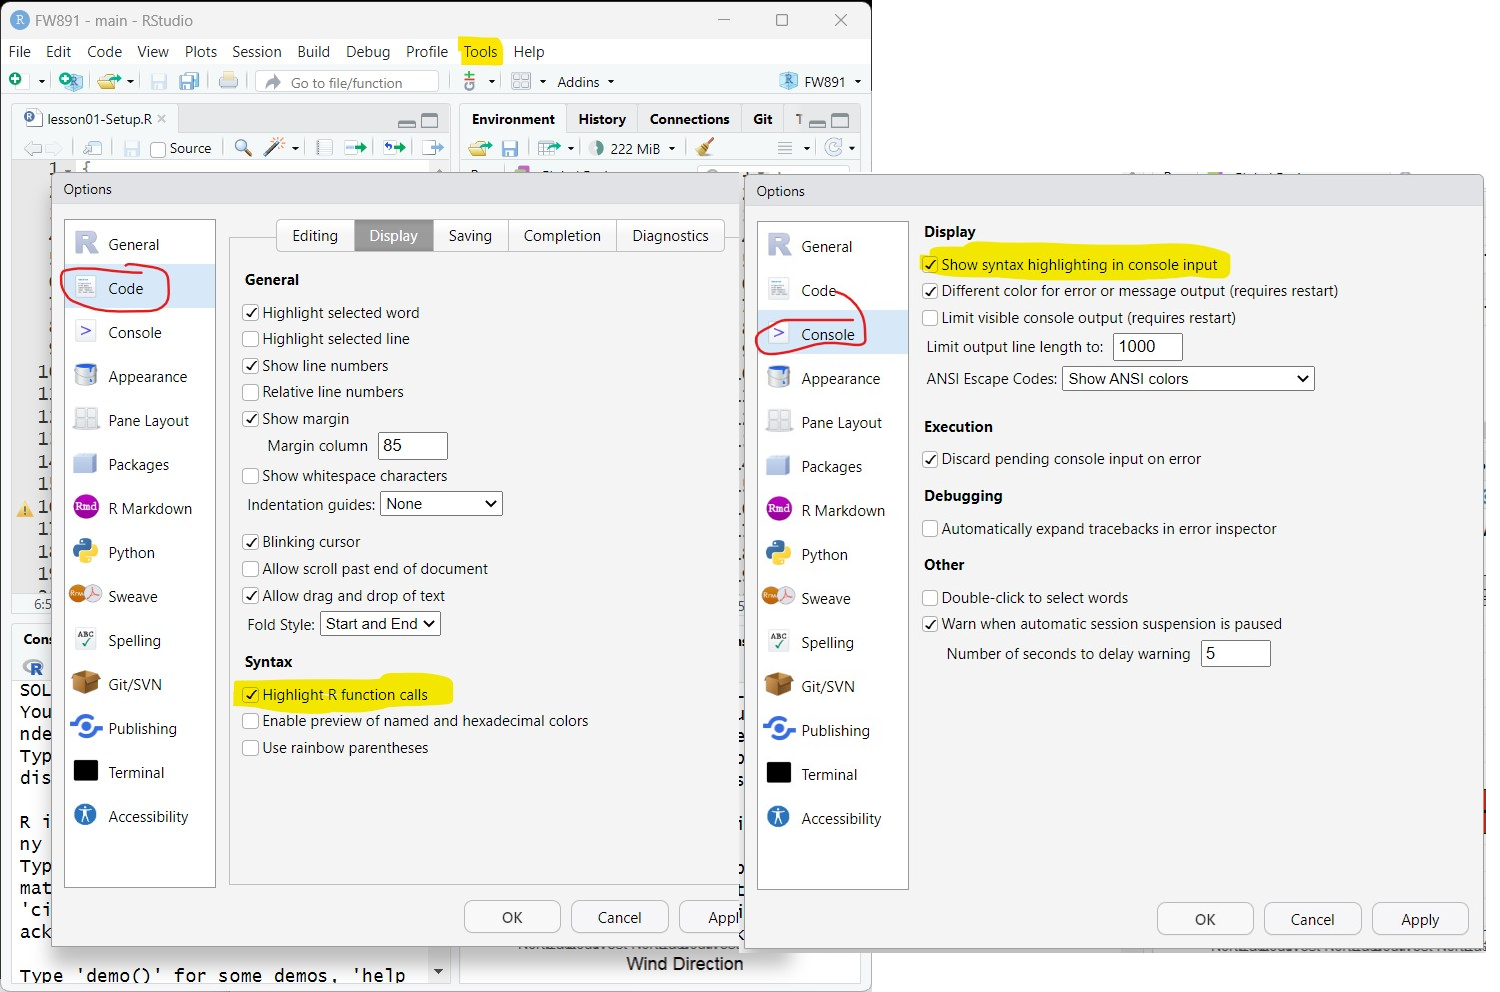
There are a couple more helpful options in RStudio that use color to distinguish components of your code and the output in the Console tab.
To make these changes go to
Tools -> Global Options… -> Code -> Display and check:
- Highlight R function calls
Tools -> Console and check:
- Show syntax highlighting in console input
10 Extension: Stop RStudio from automatically adding matching parenthesis and quotes
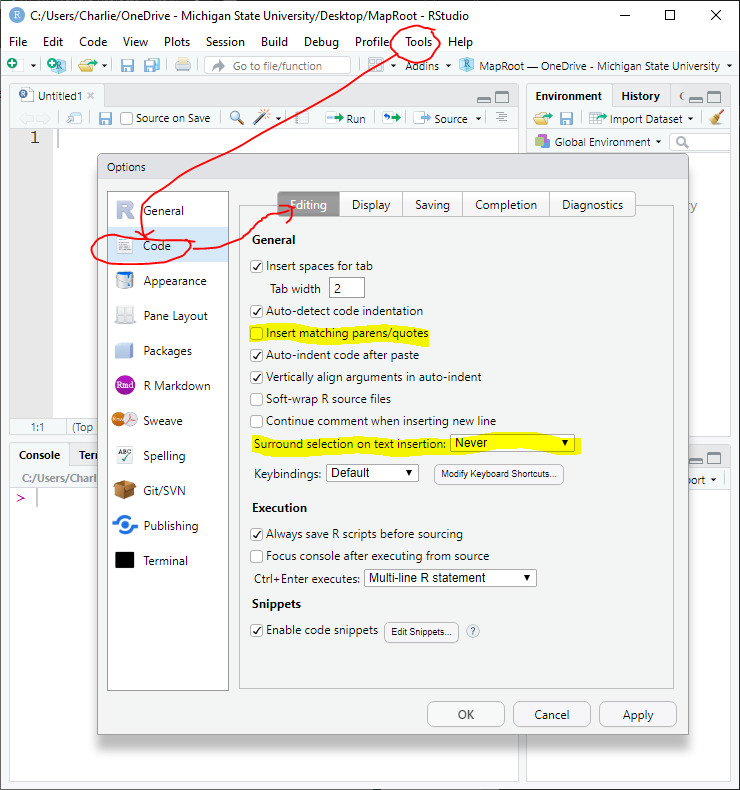
A common complaint I have gotten from my students is they hate the way RStudio tries to be “helpful” by automatically adding matching parenthesis or quotes when the user types in a parenthesis or start quote.
You can turn off this feature by:
going to Tools -> Global Options… -> Code -> Editing
uncheck Insert matching parens/quotes
set Surround selection on text insertion to Never
11 Extension: RStudio Project in an existing directory
To create a new RStudio Project inside a directory that already exists (has scripts and data)
open RStudio
click File -> New Project
In the Create Project window click Existing Directory
Browse to the folder you want to be the Project working directory and click Create Project
RStudio will add a *.RProj file to the folder – this is what makes the folder an RStudio Project.
12 Extension: Working directories in R and RStudio (why RStudio Projects)
This topic is, in this author’s opinion, one of the most frustrating topic in R. Compared to other programming languages (e.g., C++. Python, Javascript), R handling of working directories makes it harderto share projects.
A working directory is the folder location used when one file is looking for another file. It is best shown by its use-case: a script file that is reading in information from another file – this file can be a data file or another script file.
For example, let’s say we have a script file called weather.r and it is pulling in data from the file weather2020.csv. weather.r needs to first find the folder location for weather2020.csv before it can access the file. To do this, weather.r needs a path to weather2020.csv. This path can be thought of as map directions between two points – and the working directory is the starting point.
For the vast majority of programming languages, there is no concept of a working directory. The process of files calling other files works like google maps – a route is specified between the two files starting with the folder the caller (e.g., weather.r) is in and ending where the callee (e.g., weather.csv) is. The path between the two files is called a relative file path.
12.1 R’s default handling of working directories
In R, the starting point, or working directory, is fixed for all R files opened in a session (called a session variable). Using the google maps analogy, this is like saying the map starting point is fixed for everyone – it does not matter where you actually are located. You can change the working directory in your script using setwd() but this changes the working directories for all R files in the session. In other words, you are simply changing the starting point to a new location and all files will now use that location.
12.2 Absolute file paths (a bad fix to the problem)
One way to get around working directories is to use an absolute file path. So, instead of mapping between weather.R and weather.csv, you just give the file path for weather.csv on your computer (called the absolute file path).
This will look something like: c:\Users\RStudent\Documents\WeatherProj\Data\weather.csv
Doing this means you do not have to worry about working directories. But this solution breaks as soon as you move files on your computer or move them to another computer. The reason is that the file path changes. Absolute file paths make it almost impossible to share file and should not be used.
12.3 How RStudio Projects handle working directory (the least-worst option)
An RStudio Project sets the working directory to the Project Folder. So, for weather.r to find weather.csv inside an RStudio Project, it just needs to know where weather.csv is located relative to the project folder. Most likely this will be something like: Data\weather.csv. This makes it far easier to share your project because the path to weather.csv will be the same on any computer.
While I believe this is by far the best method for handling working directory issues, it comes with a major caveat: You need to open script files from within the RStudio Project. Opening the project sets the working directory for all script files used in the session. If you a file outside of the Project session, then the working directory is not set by the project.
12.4 The default working directory
A working directory is not defined for a file, it is defined for a session. So, all files within that session will have the same working directory. IF you change the working directory in one file, you change it for every file within the session. This leads to awkward behavior where one R file can change the behavior of another R file within the same session by using setwd().
13 Extension: Different ways to install packages
Here are three different ways in RStudio to install packages used in your script
13.2 Use the Console tab
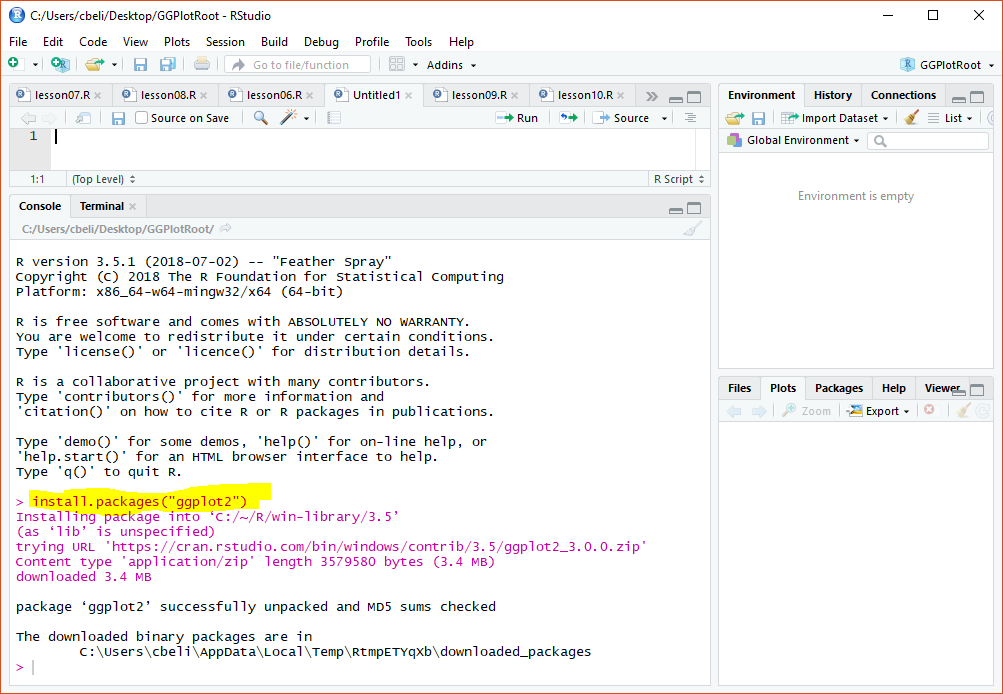
In R, we can install packages using install.packages(). So, if you wanted to install GGPlot2, you would type:
install.packages("GGPlot2")Note: you can install multiple packages at once if you put the names in a vector:
install.packages(c("GGPlot2", "gridExtra", "tidyverse")The Console tab in RStudio is an R interface, and you could type in the above line to install the GGPlot2 package.
13.3 Have RStudio install the packages
RStudio looks through your script and will prompt you to install packages used in your script that you do not have installed. With a click, RStudio installs all needed packages and dependencies.
14 Extension: The Help tab
The Help tab is essentially an intelligent online search through the R documentation. So, if you type plot in the search bar and hit enter, the R plot help page from the online documentation will appear. Note: you could have done the same thing by typing ?plot in the Console tab.
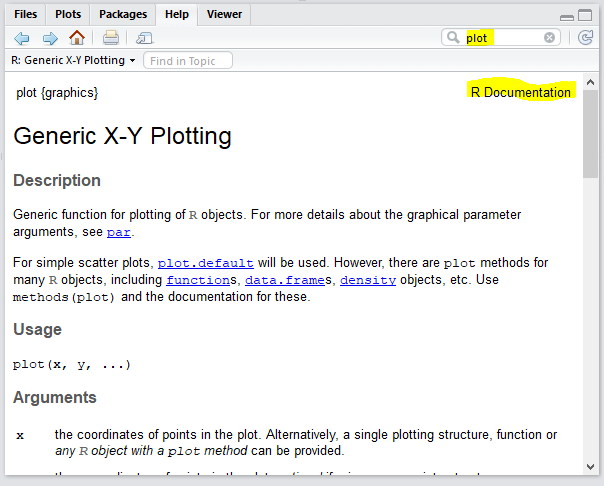
The page that appears in the Help tab (Figure 24) is this page: https://stat.ethz.ch/R-manual/R-devel/library/graphics/html/plot.html
https://stat.ethz.ch is where the official documentation for R is located. So, you will see this website appear quite often when you do an internet search for something R related.
In a future lesson we will use the Help tab to find information about GGPlot functions.
15 Extension: Run vs. Source
Technically speaking, the difference between Run and Source is:
Source will execute all the code in a script file.
Run will execute either:
The code that is highlighted (if code is highlighted) OR
The command that the cursor is on (if the command is on more than one line) OR
The whole line the cursor is on
The real difference lies in a historical discussion of scripting vs. programming, which is a discussion beyond this class. Suffice to say, R was originally intended to be more like an advanced calculator than a programming language. The script files would contain multiple lines of code that could be execute independently and in any order (think of these as buttons on a calculator). The user could click a “button” to pull in data, click another “button” to run statistical analysis on the data, and click a third “button” to output the analysis. This is what the Run button does.
However, as R has grown, the focus has shifted towards developing well-structured code just like any modern programming language (e.g., Python, C, Java). This means executing the script as a whole instead of in parts. This is what Source does. Executing your script as a whole instead of in parts has many advantages as the code is easier to debug, easier to share, and much better organized – because you are forced to organize it. In the not-so-humble opinion of this author, learning to treat your script as a whole is a vital part of learning how to program. For this reason, we will always be using the Source button in this class.
16 Extension: Create a standalone R script
There are two ways to create script file in RStudio:
A standalone script
As part of an RStudio Project
Many people use the first method. In this class we exclusively use the second method. The first method of creating a script file is fine for testing something out. The second method is far better for organizing larger projects and sharing your code with others.
The reason the second method is better is because a project consist of many file that need to talk each-other. Script files will call other scripts file or read in data from data files. In order to makes this work, the script files need to know how to find the other files. In an RStudio Project, this is easy because the working directory is always the Project Folder of your project – and all files in the project are contained within the Project Folder. So, you just need to look for the file relative to the Project Folder.
R Programmers often get around the lack of a Project Folder/defined working directory by setting the working directory in code using setwd(). This can work locally but becomes problematic when files are shared or moved. Whereas, RStudio Project always maintain their folder structure.