1-06: Run and Source
0.1 Changes…
1 Purpose
look at some of the features of R and RStudio
explore the differences between Run and Source
1.1 Files for the lesson
The script for the lesson is here
The data for this lesson is here
In this lesson the focus is on features in R and RStudio. In the next lesson the focus will be more on the content of the lesson’s script.
If you have any questions about the material in this lesson, feel free to email them to the instructor, Charlie Belinsky, at belinsky@msu.edu.
2 Output to console
In the next couple of lesson we are going to make extensive use of the Console tab, which can be used to execute code and as output for your script file. Like the Environment tab, it is difficult to maintain images so I will use text instead.
For example:
open the script for this lesson in your RStudio Project
click on line 4 (i.e., put the cursor on line 4)
click Run
The RStudio window looks like this:
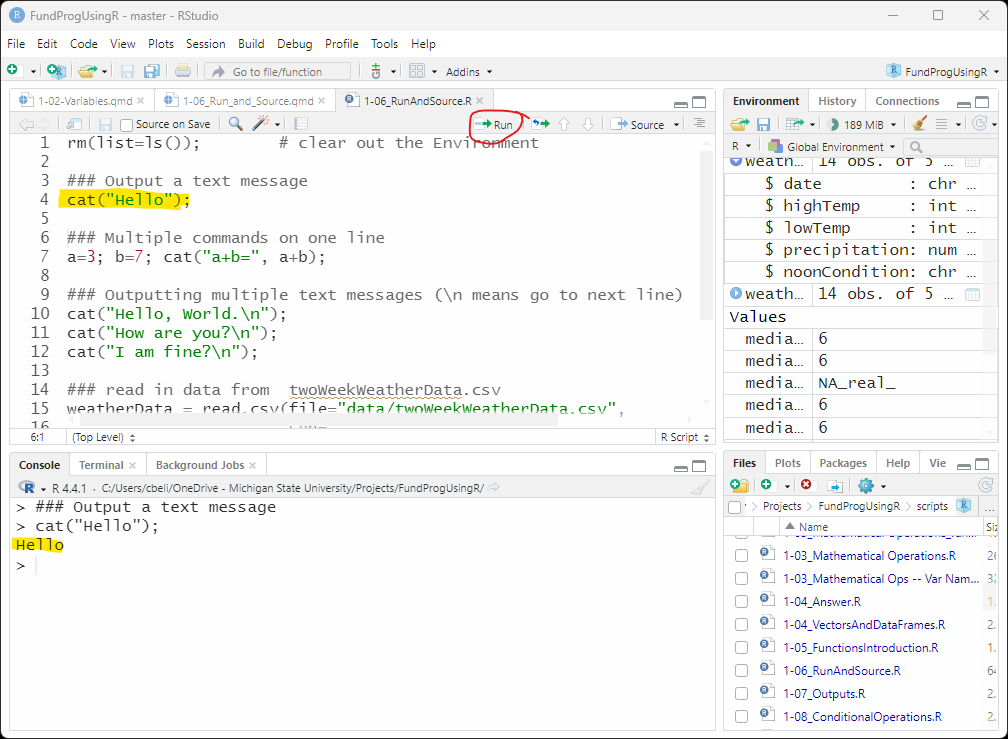
Instead of displaying the RStudio image, I will display the output to the Console tab like this:
«>»   ### Output a text message
«>»   cat("Hello");
Hello3 Run vs. Source
The Source button is used to execute the whole script (i.e., every command in the script) while the Run button is used to selectively execute commands. Run is a great tool for debugging and testing your code. We are going to almost exclusively use Run for the next two lessons.
The next two lessons are more about showing off features in R and RStudio and not about creating a full script. However, your goal with most scripts is to be able to execute the file using Source. It takes longer to develop you script using Source but it forces you to automate your script which makes your script both easier to debug and share.
3.1 Executing one line
We already have an example of using Run to execute one line in Figure 2. When we put the cursor on line 4 and clicked Run, R executed the cat() command on line 4. We will talk much more about cat() next lesson but cat() outputs to the Console whatever is in the parentheses.
Actually, clicking Run does not just execute the line, but everything associate with the command on the line. When you look at the Console output, you see that lines 3 and 4 were both executed – but line 3 was just a comment line so it does not do anything.
>   ### Output a text message
>   cat("Hello");
Hello 3.2 Executing multiple commands on one line
You can put as many command as you want on one line as long as use semicolons between them.
The following line has three commands that
create two variables (a and b)
output the addition of them to the Console.
a=3; b=7; cat("a+b=", a+b);Clicking Run on the line will add a and b to the Environment:
a:   3
b:   7
And the addition of a and b is displayed in the Console:
>   ### Multiple commands on one line
>   a=3; b=7; cat("a+b=", a+b);
a+b= 10
If you remove the semicolons then you will get the error: unexpected symbol in ” a=3 b”
R is saying the it does not understand what the symbol b means because R thinks that b is a continuation of the a=3 command.
3.3 Executing highlighted script
You can also highlight parts of your script and Run will executed exactly what is highlighted.
If you completely highlight lines 10, 11, and 12:
  cat("Hello, World.\n");
  cat("How are you?\n");
  cat("I am fine?\n");
and click Run, the output to the Console is:
>   cat("Hello, World.\n");
Hello, World.
>   cat("How are you?\n");
How are you?
>   cat("I am fine?\n");
I am fine?When you highlight code and click Run, Run will execute exactly what you highlight. So, if you accidentally highlight a bit of line 9 along with lines 10-12:
  ### Outputting multiple text messages «(\n means go to next line)»
  «cat("Hello, World.\n");»
  «cat("How are you?\n");»
  «cat("I am fine?\n");»
Then in the Console you will get the error:
> (\n means go to next line)
Error: unexpected symbol in "(\n"
R is trying to execute the last part of line 9 and R does not know that this is supposed to be part of a comment because you did not highlight the ### part of the line.
To recap, when you click Run and…:
…the cursor is in a line: R will execute all commands on that line.
…part of your code is highlighted: R will execute exactly what is highlighted
3.4 Executing one command on multiple lines
Lines 15-17 contain the command to open the twoWeekWeatherData.csv file and save the data to a data frame named weatherData.
  ### read in data from  twoWeekWeatherData.csv
  weatherData = read.csv(file="data/twoWeekWeatherData.csv",
                         sep=",",
                         header=TRUE);
When you click Run, R will execute whatever command the cursor is in the middle of. If we put the cursor on any line from 15-17 and click Run, R will execute all 3 lines. In this case, the command starts on line 15 with weatherData = and ends on line 17 with header=TRUE);.
When we Run line 15, the Console output shows lines 14-17 (14 is a comment) were executed – the ( + ) at the beginning of the lines in the Console says that this line is a continuation of the command from the previous line.
>   ### read in data from  twoWeekWeatherData.csv
>   weatherData = read.csv(file="data/twoWeekWeatherData.csv",
«+»                          sep=",",
«+» header=TRUE);Executing lines 14-17 means that you have a new variable named weatherData and this variable is put in the Environment tab:
weatherData 14 obs. of 5 variables4 Entering commands directly into Console
When you click Run you are sending commands to the Console, but you can directly type commands in the Console – and it will produce the same results.
So, if you type cat(“Hello”) into the Console you will get:
> cat("Hello")
Hello
A common issue for people using the Console is that they will not complete commands. For example, type cat(“He in the Console and press enter:
> cat("He
+
A ( + ) appears on the next line. The ( + ) means that R sees the beginning of an unfinished command and is waiting for you to finish it. This will also happen if you highlight only part of a command in the script and press Run. You can finish it by typing llo”) in the Console but the results will still be a bit off:
> cat("He
+llo")
He
llo
If you see a ( + ) in the Console and have no idea what to do, you can press the esc key to get out of it.
4.1 Quick view of variables
Another use for the Console is to quickly view some value. If you want to see the highTemp column in weatherData you can type in the Console:
> weatherData$highTemp
 [1] 57 50 54 40 39 58 60 53 55 44 39 54 61 75
Note: after you type $ in weatherData$, RStudio will start offering you column suggestions – a very convenient feature when you have large dataframes.
5 Duplicating lines of code
Quite often in programming, you are producing multiple lines that are very similar. For instance, you might have multiple lines that start with a cat() command. In RStudio you can duplicate a line by putting your cursor on the line and clicking Control-Shift-D (Windows) or Command-Shift-D (Mac).
If you click Control/Command-Shift-D on line 12, you will get:
  ### Outputting multiple text messages
  cat("Hello, World.");
  cat("How are you?");
  cat("I am fine?");
«cat("I am fine?");»If you highlight text within your script and click Control/Command-Shift-D, then the highlighted text will be duplicated. In this case, I highlighted the first Hello, World. and then clicked Control/Command-Shift-D:
  ### Outputting multiple text messages
  cat("Hello, World.«Hello, World.»");
  cat("How are you?");
cat("I am fine?"); 6 Block Comments
Often when you are testing code you want to comment lines so they do not execute. In RStudio you can comment a bunch of lines at once by highlighting the lines you want commented and clicking Control-Shift-C on Windows and Command-Shift-C on a Mac.
If you highlight lines 11-14 and press Control/Command-Shift-C, a ( #) will appear at the beginning of each line:
«#» ### Outputting multiple text messages
«#» cat("Hello, World");
«#» cat("How are you?");
«#» cat("I am fine?");Note: A ( # ) is added to all highlighted lines – even those that were already commented like line 11
6.1 Uncommenting a block
If all the lines highlighted already have a ( # ) then pressing Control/Command-Shift-C will uncomment all the lines (i.e., remove a #). Uncommenting only removed the first # – so if you uncomment the lines from Figure 9, then the lines will revert back to:
### Outputting multiple text messages
cat("Hello, World");
cat("How are you?");
cat("I am fine?");7 Keyboard shortcuts in RStudio
Control/Command-Shift-C and Control/Command-Shift-D are the RStudio shortcuts I find the most useful. You can view all the keyboard shortcuts (and there are a lot) in RStudio by clicking Tools -> Keyboard Shortcuts Help.
8 Breaking up long lines of code
Line 15-17 is one command stretched over multiple lines:
Just like a period ends a sentence, a semicolon designates the end of a statement. In this case, the read.csv() statement is three lines long so the semicolon goes at the end of the third line. As a reminder, R does not enforce semicolon usage, but it is a good idea to put them in.
We could put the whole command on one line and it would execute exactly the same:
  ### same command as above -- this is a little harder to read
  weatherData2 = read.csv(file="data/twoWeekWeatherData.csv", sep=",", header=TRUE);
weatherData2 appears in the Environment alongside weatherData, and it is exactly the same as weatherData:
weatherData     14 obs. of 5 variables
weatherData2    14 obs. of 5 variables
But, it is easier to read the multiple-line code. As a general rule, you should try to avoid horizontal scrolling of your script (anything beyond 85 characters) as this makes the script much harder to read.
In R, you can break most lines of code into multiple lines with a few exceptions (one exception being long file-paths). You just need to be judicious about how you break up the line – the best places to break up a line of code are after a comma or where a space occurs.
9 Putting margin lines in your script
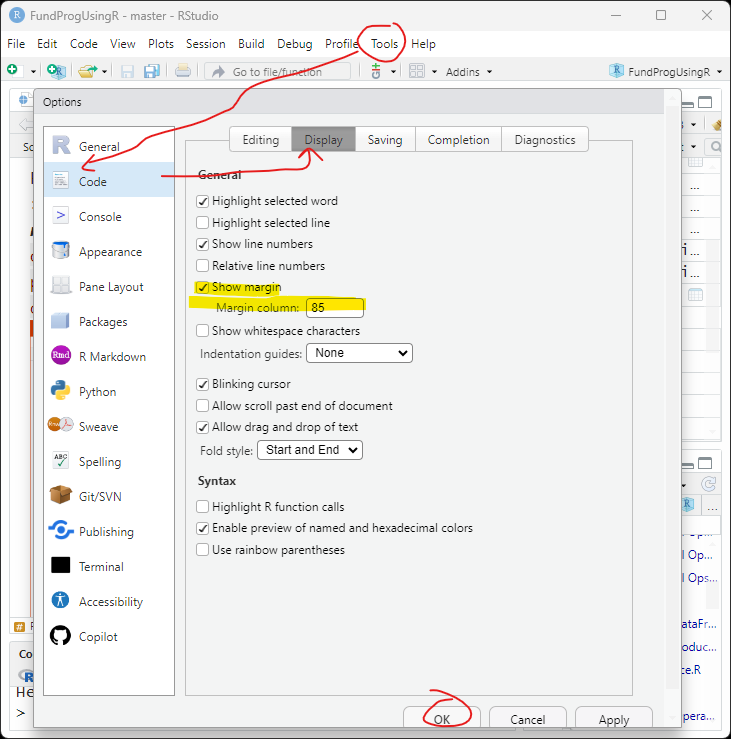
The generally accepted standard in R for the maximum number of characters in a line of code is 80. This is not a hard-and-fast rule, but keeping your lines 85 characters or less makes it a lot easier to read your code especially on smaller monitors (e.g., laptops). You can put a margin line at 85 characters in RStudio by clicking Tools -> Global Options -> Code. On the Display tab check Show margin and set Margin column to 85. One of the requirements of this class is that, when possible, you keep your script lines to 85 characters or less.
Now you will see a grey vertical line at 85 characters (Figure 12) . The line is there as a guide – you can still type beyond this line. There are times when it is not possible to keep a line to 85 characters – the most common reason is a long file-path name because file-path names cannot be broken up.
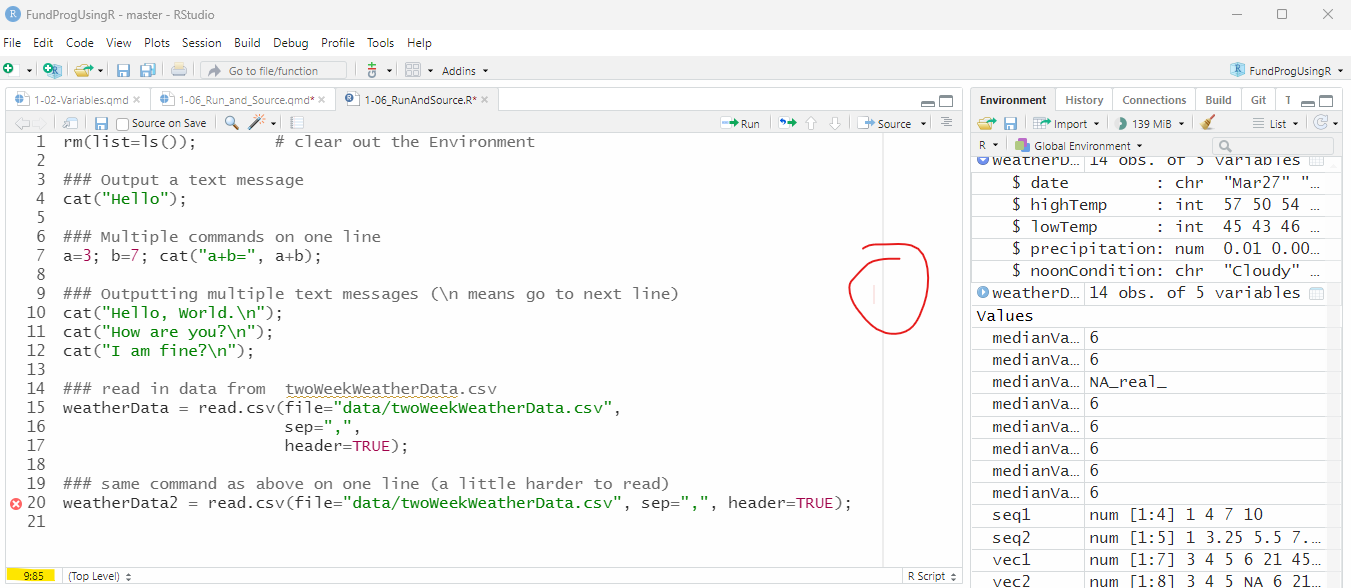
Note: You can also see the cursor’s character position is on in the lower-left corner of Figure 12 – in this case, line 9, character 85.
10 Application
Highlight lines 15 and 16 in the lesson script and click Run. In comments explain what happens and why.
Highlight lines 16 and 17 in the lesson script and click Run. In comments explain what happens and why.
Combine the lines 10, 11, and 12 into one line – don’t change the cat() commands.
In comments answer the following questions:
How many commands are there in the script file for this lesson?
Assuming there is no limit for line length (i.e., you can go as far beyond 85 characters as you want): If you rewrote the script, what is the minimum number of lines you would need to execute every command?
Save the script as app1-06.r in your scripts folder and email your Project Folder to Charlie Belinsky at belinsky@msu.edu.
Instructions for zipping the Project Folder are here.
If you have any questions regarding this application, feel free to email them to Charlie Belinsky at belinsky@msu.edu.
10.1 Questions to answer
Answer the following in comments inside your application script:
What was your level of comfort with the lesson/application?
What areas of the lesson/application confused or still confuses you?
What are some things you would like to know more about that is related to, but not covered in, this lesson?