1-11: For Loops and State Variables
0.1 Issues
1 Purpose
- Show more example of using for loops with state variables
2 Questions about the material…
The files for this lesson:
Script: you can download the script here
If you have any questions about the material in this lesson, feel free to email them to the instructor, Charlie Belinsky, at belinsky@msu.edu.
3 for loops – a vital skill
In this lesson, we will be using for loops and if() statements to do common calculations on a vector (e.g., finding the sum, finding maximum value, checking if any value meets a condition). There are functions for all of these calculations in R that are easier to use than a for loop. However, the best way to learn for loops is to use them in applications that are easy to understand. You are going to have many situations where you cannot rely on an R function or package – and for loops with embedded if-else statements are often the best solution.
Understanding how to effectively use for loops is perhaps the most vital skill you will learn as a programmer.
4 Multiple state variables
We ended last lesson by introducing you to the concept of a state variable – a state variable is a variable that updates information (e.g., the state of some value) as the for loops cycles. The state variable is always declared outside of the for loop and modified in the codeblock attached to the for loop.
The state variable needs to be initialized to some default value. You can think of the default value as the value the state variable should be if the for loop has no cycles. In the last example from last lesson, the state variable sunnyDays was initialized to 0, which is the correct value if the for loop never cycles (0 days checked means 0 sunny days)
sunnyDays = 0; # state variable -- will hold the count of sunny days

for(i in 1:numDays)
{
  if(noonCond[i] == "Sunny")  # was the day sunny
  {
    sunnyDays = sunnyDays +1;   # it was -- increase sunnyDays by 1
  }
  # there is no else here -- we don't care about non-sunny days
}Now, let’s expand this for loop to count for two different conditions: Sunny and Rain. We will now need two state variables – initializing both values to 0.
sunnyDays = 0; # state variable -- will hold the count of sunny days
rainyDays = 0; # state variable -- will hold the count of rainy days

for(i in 1:numDays)
{
  if(noonCond[i] == "Sunny")
  {
    sunnyDays = sunnyDays +1; # increases sunnyDays by 1
  # We use else if here because we know "Sunny" and "Rain" are mutually exclusive
  }else if(noonCond[i] == "Rain")
  {
    rainyDays = rainyDays +1; # increases rainyDays by 1
  }
}And we can look in the Environment tab to see what the final values of rainyDays and sunnyDays were:
rainyDays:   3
sunnyDays:   6
You can double check the noonCond vector and see there are 6 sunny and 3 rain days.
> noonCond
[1] "Cloudy" "Cloudy" "Sunny" "Rain" "Fog" "Sunny" "Sunny" "Cloudy" "Rain" "Rain"
[11] "Snow" "Sunny" "Sunny" "Sunny"
4.1 The if-else statement
In Figure 2 we used an if-else structure to separate the two conditional statement (Sunny and Rain). We could have just used two if() statements. In other words, the 10th line could have been written:
if(noonCond[i] == "Rain")But then we would be checking for Rain on days that we already know is Sunny. noonCond on a specific day cannot be both Sunny and Rain (i.e., they are mutually exclusive) so the extra checks are not needed. The code would still work, just not be as efficient (and harder to debug, a more advanced topic).
5 State variables uses
We can also use state variables on numeric values to count how many times a condition is met.
In this case, we will look at how many time
the temperature was greater than 60
the temperature was less than 50.
We are looking at two situations so we need two state variables. Again, we initialize the values of the state variables to 0 because 0 would be the correct answer if the for loop never cycled (0 days checked means 0 days above 60 or below 50).
tempGT60 = 0; # days with temperatures greater than 60
tempLT50 = 0; # days with temperatures less than 50

for(i in 1:numDays)
{
  if(highTemps[i] > 60)      # high temp more than 60
  {
    tempGT60 = tempGT60 +1;
  }else if(highTemps[i] < 50) # high temp less than 50
  {
    tempLT50 = tempLT50 +1;
  }
}And we can look in the Environment tab to see the final values of the state variables:
tempGT60:   2
tempLT50:   4
Again, you can check highTemps in the Console to see this is correct:
> highTemps
[1] 57 50 54 40 39 58 60 53 55 44 39 54 61 75
5.1 Sequences with the for loops
Perhaps you do not want to check every day – maybe you only want to check every-other day. In this case you use seq() in the for loop to subset the days:
tempGT60odd = 0; # odd indexed days with temperatures greater than 60
tempLT50odd = 0; # odd indexed days with temperatures less than 50

for(i in «seq(from=1, to=numDays, by=2)») # every other day (1,3,5,7...)
{
  if(highTemps[i] > 60)
  {
    tempGT60odd = tempGT60odd +1;
  }else if(highTemps[i] < 50)
  {
    tempLT50odd = tempLT50odd +1;
  }
}
And, again, the Environment tab will show the final values of the state variables:
tempGT60odd:   1
tempLT50odd:   2
6 State variable to sum values
We have used state variables to count values – adding 1 to the state variable during each cycle of a for loop when a condition is TRUE.
Next we will use a state variable to add values. In this case, adding up precipitation values to get the total precipitation. Again, we initialize the state variable to default value of 0, because 0 is the answer if there is nothing to add.
The difference is that, instead of adding 1 to the state variable, we add the precipitation for that day, or precip[i] where i is the index variable.
Note: there are no if() statements in this for loop because we are always (i.e., unconditionally) adding every days’ precipitation to the total precipitation
totalPrecip = 0;
for(i in 1:numDays)
{
  totalPrecip = totalPrecip + precip[i];
}7 if-any checks
Now we are going to use a state variable to see if any value in the vector meets a condition.
We are going to initialize the state variable to FALSE and if any variable meets the condition, the state variable will be changed to TRUE. The condition we will look is whether a temperature is less than 40.
Trap: Using T and F to represent TRUE and FALSE is a bad idea
anyDayLT40 = FALSE;

for(i in 1:numDays)
{
  if(highTemps[i] < 40)
  {
    anyDayLT40 = TRUE;
  }
}After executing the script, we see that anyDayLT40 in TRUE in the Environment meaning at least one value in highTemps was less than 40.
You can easily test other scenarios by changing the if() condition. For example:
# Check if any value in highTemps is less than 30
anyDayLT30 = FALSE;     # initialize state variable to FALSE
for(i in 1:numDays)
{
  if(highTemps[i] < 30)
  {
    anyDayLT30 = TRUE;  # will never be executed -- anyDayLT30 remains FALSE
  }
}
After executing this script, we see that anyDayLT30 in FALSE in the Environment meaning no value in highTemps was less than 30.
7.1 The break statement
In Figure 5, the for loop is inefficient because it will continue to check every temperature value even after one of them passes the condition of being greater that 40. This is not necessary because we only care if at least one value meets the condition. We do not care if more than one meets the condition
To make the code more efficient, we can add a break statement to the codeblock attached to the if(). break is a command that tells R to immediately exit the for loop. In other words, if the 5th value passes the condition, the for loop will end and not cycle through values 6-14.
  # A more efficient check if any value in highTemps is less than 40
  anyDayLT40_2 = FALSE;     # initialize state variable to FALSE
  for(i in 1:numDays)
  {
    if(highTemps[i] < 40)
    {
      anyDayLT40_2 = TRUE;  # found a value -- change state variable to TRUE
      «break;»                # exits the for loop immediately
    }
  }
A break statement in the above code will not meaningfully speed up this script, but it will speed up script that is cycling through 1000s or 10000s of times through a for loop.
8 Finding the highest (or lowest) value
For the last example we are going to find the highest temperature in a vector. We do this by cycling though each value in the vector highTemps and comparing it to the current highest temperature. If the new value is higher than the highest temperature, then we set that to be the highest temperature.
Here is the code – we will go over it in more detail in a bit:
highestTemp = 0;  # initialize the state variable to 0

for (i in 1:numDays)
{
  if(highTemps[i] > highestTemp) # is this day's value grater than the current high
  {
    # this day's value is higher -- set highestTemp to this value
    highestTemp = highTemps[i];
    cat("Day", i, "has a new high temp", highestTemp, "\n");
  }
}8.1 Using browser() to pause your script
The for loop above is going through every value in the vector highTemps in order. Each time a new high temperature is found, highestTemp is set top that value. So, highestTemp is going to start at 0 (the initial value), and change multiple times.
If we put highTemps in the Console, we can see each time a new highest temperature should occur:
> highTemps
 [1] «57» 50 54 40 39 «58» «60» 53 55 44 39 54 «61» «75»
A new highest temperature will be discovered 5 times: 57, 58, 60, 61, and 75 (cycles 1, 6 , 7, 13, and 14).
When we execute the code, the cat() command tells us the same thing:
Day 1 has a new high temp 57
Day 6 has a new high temp 58
Day 7 has a new high temp 60
Day 13 has a new high temp 61
Day 14 has a new high temp 75
Then the script will pause at that line when the condition if(highestTemp > highTemps[i]) is TRUE, which happens 5 times (out of 14 cycles) when i = 1, 6, 7, 13, and 14.
8.2 Initializing the state variable
I initialized the state variable, highestTemp, to 0 – and that works in this case because we know there are temperatures greater than 0. But, if all the temperatures were negative, then this would not work (I will let you answer why this would not work in the Application).
A better solution is to set the state variable to the first value in the vector (highTemps[1]). This makes the first value in the highTemps vector the default answer. In other words, if every conditional check is FALSE (i.e., no temperature is greater than the first) then the first temperature is the highest temperature.
Note: this means you could start the indexing variable i at 2 instead of one. You do not need to test the 1st value against the 1st value – there is no harm but it is a tiny bit inefficient.
highestTemp2 = highTemps[1];  # set the state variable to the first value in the vector

for(i in 1:numDays) # could be (i in 2:numDays)
{
  if(highTemps[i] > highestTemp2) # is this day's value greater than the current high
  {
    highestTemp2 = highTemps[i];  # set the state variable to the current day's value
    cat("Day ", i, " the highest temp changed to ", highTemps[i], "\n", sep="");
  }
}Whenever you are looking for the most extreme value in a vector, it is best to set the state variable to the first value in the vector. By doing this, you do not have to guess what kind of values you are going to get.
9 Application
1) In comments answer:
- What happens if you set the state variable to 0 when trying to find the highest temperature if all temperatures are negative?
2) Find out if any of the even days low temperatures were at least 50 degrees.
add code that outputs to Console which day met the condition
add code to exit the for loop when the condition is first met
3) Find the mean of the low temperatures using for loops
- get the total and divide by the number of values.
4) In one for loop find out how many days had:
1 inch or more rain
between 0.1 and 1 inch of rain (not inclusive of 0.1 or 1)
0.1 inches or less rain
5) Find out the lowest low temp and output to the Console the lowest temperature and the date it occurred on.
6) On days that were cloudy: find the highest temperature and the mean temperature .
Save the script as app1-11.r in your scripts folder and email your Project Folder to Charlie Belinsky at belinsky@msu.edu.
Instructions for zipping the Project Folder are here.
If you have any questions regarding this application, feel free to email them to Charlie Belinsky at belinsky@msu.edu.
9.1 Questions to answer
Answer the following in comments inside your application script:
What was your level of comfort with the lesson/application?
What areas of the lesson/application confused or still confuses you?
What are some things you would like to know more about that is related to, but not covered in, this lesson?
10 Trap: Using T and F to represent TRUE and FALSE is a bad idea
The terms TRUE and FALSE are reserved keywords in R (just like if, for, else…) – this means that TRUE and FALSE are predefined and cannot be used as variable names in R.
If you try to assign a value to a “variable” named TRUE or FALSE, you will get an invalid (do_set) left-hand side to assignment error (Figure 8). This is the same error you get if you try to assign a number to a number (i.e., 10 = 5).
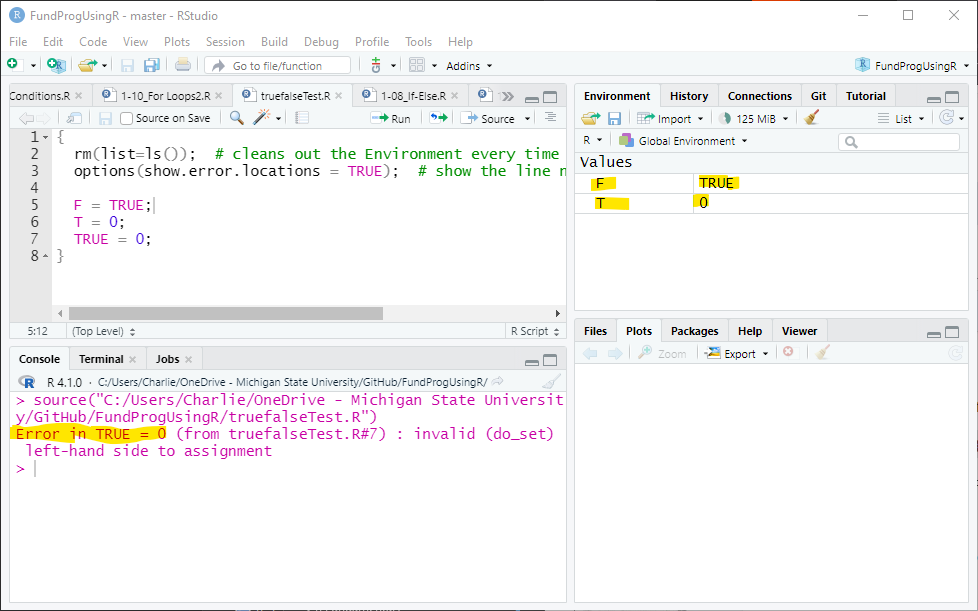
You will often see R scripts that use T and F as shortcuts for TRUE and FALSE. R accepts T and F as shortcuts for TRUE and FALSE but you should not use T and F to represent TRUE and FALSE because T and F are not protected keywords. T and F can be overwritten as shown in Figure 8.
If T or F get overwritten then your code will produce unexpected results. It is best to stick with the reserved (and protected) keywords TRUE and FALSE.