1-01: Project Folders
1 Purpose
Install, setup, and test the software you will need for this class
Provide a basic overview of the Positron environment
Execute an R script in Positron
Use Git and GitHub to save class work
- This is far from a Git/GitHub tutorial – it is just enough to share your class project folder on GitHub
2 Questions about the material…
If you have any questions about the material in this lesson, feel free to email them to the instructor, Charlie Belinsky, at belinsky@msu.edu.
3 Install R, Positron and Git on your computer
We are going to install R, Positron, and Git on your computer. R is a programming language, Positron provides a structured environment for the R programming language. Git tracks changes to your files over time, while GitHub stores those files online for backup and collaboration—and together they’re the most widely used tools for managing and sharing code.
For Windows, the installation is straightforward and you can use the default settings for all programs. For Macs the installation of Git is a little harder.
Note: Even if you already have the software installed, it is a good idea to verify you have a recent version.
3.1 Install or update R (recommend version 4.5 or higher)
The R for Windows download is here. Click on Download R 4.#.# for Windows.
The R for Mac download is here.
There are two versions of R for Mac
R-4.#.#-arm64.pkg: for newer Macs (starting in 2021) with Apple Silicon processors (M1, M2,…)
R-4.#.#-x86_64.pkg: for older Macs with Intel-based processors
The installer will tell you If you pick the wrong pkg file – there is no harm except a bit of wasted time.
Linux user: the R installation instruction for major distributions are here. However, these instructions are inadequate for many distributions – you probably will have to search how to install R on your distribution.
3.2 Install or update Positron (need at least version 2026.02)
You can download Positron here. Don’t forget to accept the Positron legal agreement before downloading.
There are two Windows installation files: system-level and user-level. User-level is probably what you want unless you are installing this on a computer where there are multiple users who are all going to use the same settings.
Just like R, there are two Mac installations: Apple Silicon (new) and Intel (old).
3.3 Install or update Git (Windows)
For Windows, go here to download the latest version of Git. Git asks a lot of questions during installation – the default options are fine.
3.4 Install or update Git (Mac)
There is no direct Git installation on Mac. Homebrew is the best option and Homebrew is a useful tool for any programmer using a Mac because it gives you access to a bunch of programming tools.
To install Git on a Mac:
Go to the Homebrew homepage
Copy the text under the heading Install Homebrew
Paste the text in a Terminal window (Positron has a Terminal tab in the bottom-left pane)
- Be patient – it takes time to install!
When Homebrew is finished installing, install Git by typing in the Terminal
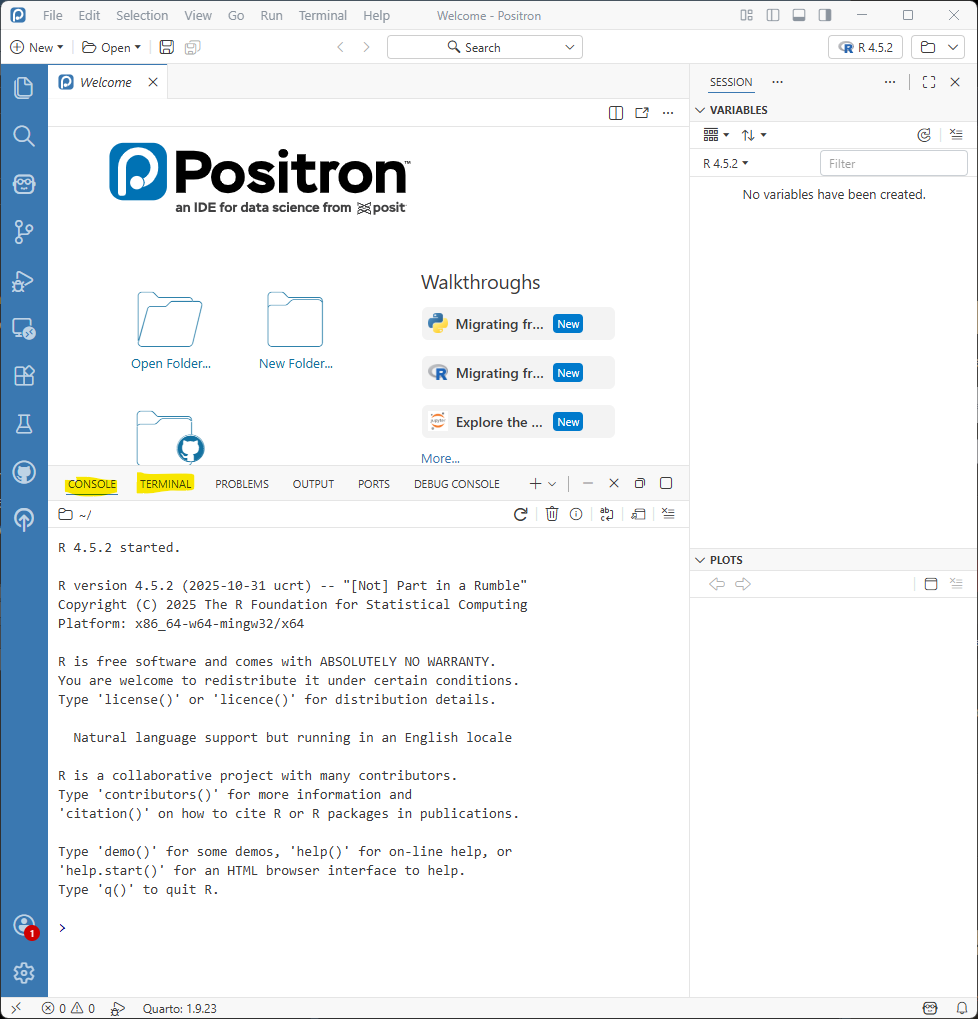
- You can use the Mac Terminal or the Terminal in Positron (Figure 1):
brew install git - And then install the credential manager by typing in the Terminal:
brew install --cask git_crendential_manager4 Console and Terminal tabs
We are going to use both the Console and Terminal tabs inside Positron to execute commands. The Console tab executes programming language commands (in this case, R) and the Terminal executes operating system commands. The Terminal tab is linked to Command Prompt (Windows) or Terminal (Mac/Linux).
5 Configuring Git (Terminal tab)
Before you use Git, you first need to configure Git on your computer with your GitHub username and email (i.e., the email you use to sign up for your GitHub account). The username and email are used by Git to identify who made what changes in the project history.
5.1 Adding the username and email
We will use the Positron Terminal tab (Figure 1) to set these values.
The first command sets the user name in Git (replace Your_GitHub_ID with your GitHub ID):
git config --global user.name "«Your_GitHub_ID»"The second command sets the user email in Git (replace Your_GitHub_email with the email you used to signup for GitHub):
git config --global user.email "«Your_GitHub_Email»"5.2 Viewing the configured values
Git does not check if your user.name and user.email are valid. You can check the username and email by executing these lines in the Terminal tab:
git config user.name
git config user.email
After executing the two above command, your Terminal tab should look similar to this:
$ git config user.name
belinskyc
$ git config user.email
belinsky@msu.edu6 Installing a package (Console tab)
GGPlot2, is a widely used package that does not come with R – so we are going to install the GGPlot2 package using the Console tab.
Type the following in the Console and press enter:
install.packages("ggplot2")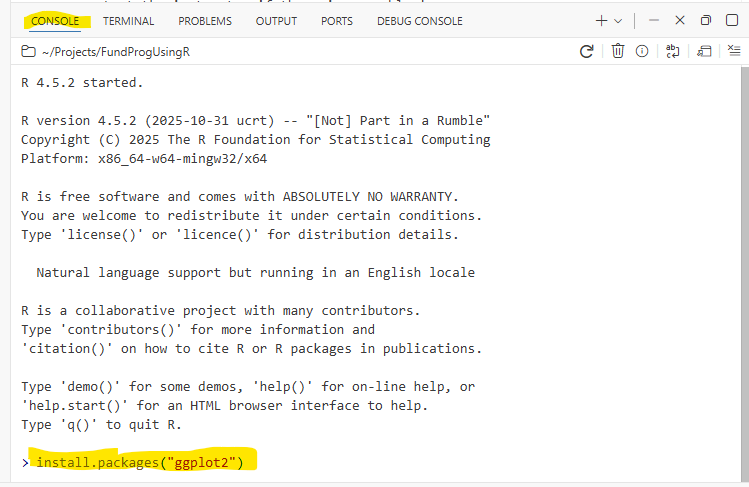
GGPlot2 requires many other packages (its dependencies) – and Positron will install those packages along with GGPlot2. Be patient, as this could take a little time.
7 Positron and Project Folders
Most of the work you will do in R involves multiple scripts, data files, and probably other file types. All these files together make up your project and they should exist within a self-contained Project Folder, which is a folder that contains all the files and subfolders for your project. It is the Project Folder that gets uploaded to GitHub.
7.1 Create a new Project Folder
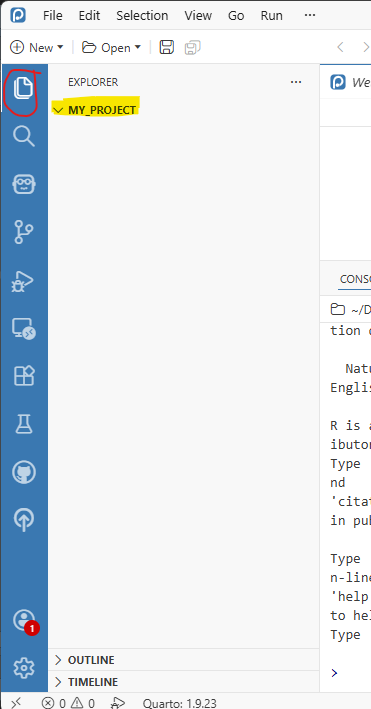
Create a new folder in any location on your computer and name the folder something appropriate (I named it My_Project).
To open the new folder as a Project Folder in Positron:
click Open -> Open Folder…
Navigate to the folder location
Click on Folder and click Select Folder
Note: you can also use the Positron interface to create a new folder (New -> New Folder from Template…), but, for now, there is no advantage to it.
7.2 Isolating a project
When you click Open in Positron, you can choose Open File… or Open Folder…. Most of the time, you should open a folder first and then open your script from inside the folder.
Positron treats that folder as a container for all of your work, creating a self-contained space where your scripts, data, and other files reside. This makes it easier for files to find each other (e.g., when a script reads a data file) and helps ensure that new files are saved in the right place. Keeping your work isolated to one folder (and its subfolders) makes it much easier to share the project on GitHub.
For those who have worked in R before, Positron also sets the project folder as the Working Directory.
7.3 Add subfolders
The Positron Explorer tab is a File Manager and allows you to do most of the things that you can do in your operating systems File Manager (called File Explorer in Windows and Finder in Mac). The Explorer tab can be used to open, add, remove, rename files and folders, and drag-and-drop files.
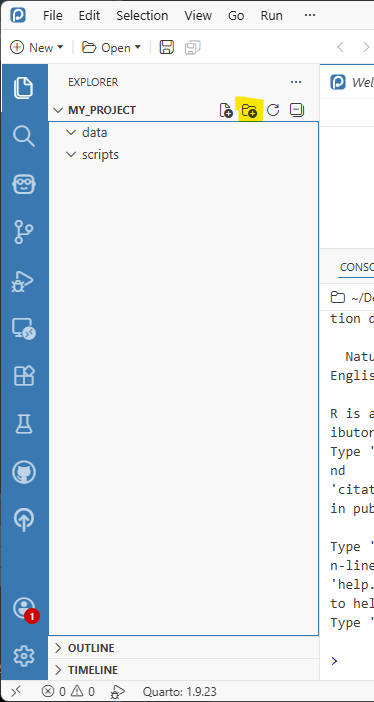
We will use the Explorer tab in Positron (top-left tab) to create two subfolders: scripts and data.
To add two folders named scripts and data:
Click on New Folder icon next to the Project Folder name (highlighted in Figure 5)
- note: you can also right-click inside the area and choose New Folder…
Enter scripts in the textbox and click OK
Repeat the last two steps to add a folder called data
- Make sure you put data inside the project folder – not inside the scripts folder
7.4 Add files to the project
Now we will download two files and add them to your Project Folder.
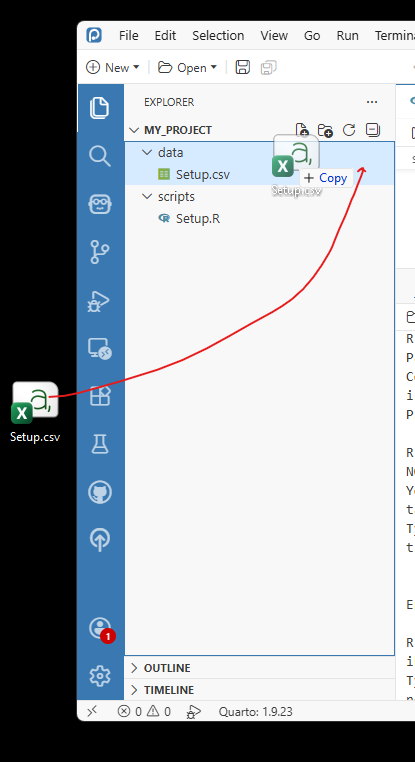
You can either put the files in the directories using your File Explorer or you can drag-and-drop the file into the folder using Explorer in Positron (Figure 6).
8 Positron Basics
Now we are going to execute the script file, Setup.R, that we just downloaded to your Project’s scripts folder.
Setup.R takes weather data from the other downloaded file, Setup.csv and creates boxplots showing how Wind Direction and Wind Speed relate to the Change In Temperature.
We are executing the script to test your setup and help you become familiar with the Positron environment – not to teach the code in the script (although some will be taught later in class)
8.1 Open your Project folder in Positron
Position remembers the last opened Project Folder, but let’s start from scratch and close the project folder by clicking File -> Close Folder. Now we have a clean Positron window without anything open.
There are multiple ways to open a Project Folder in Positron – three of them are:
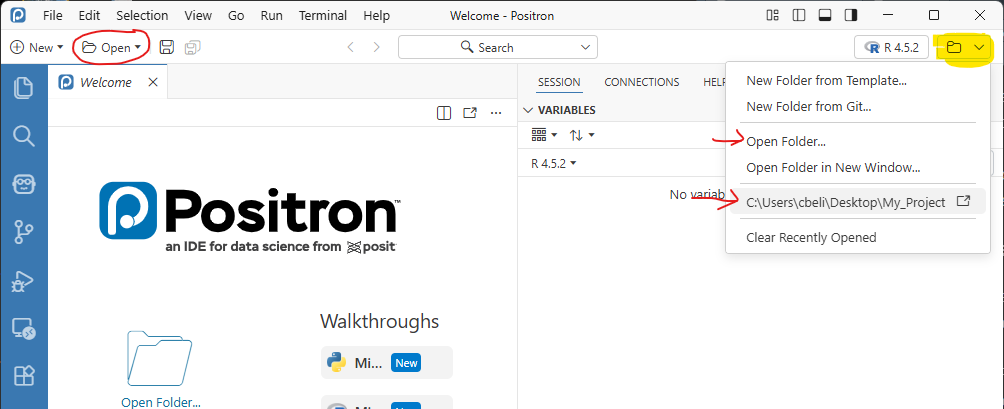
In Positron, click Open -> Open Folder… -> navigate to the Project Folder and click Select Folder
- It is likely that the folder is already in the recently opened list (circled in Figure 7)
In Positron, click the folder icon in the upper-right corner and click Open Folder, or choose a Project Folder that has recently been opened (highlighted in Figure 7)
You can drag and drop a folder into Positron
8.2 Open and execute a script file in your Project
To open the script file, in the Explorer tab navigate to the script folder and click on the script inside. It will open in an editor tab.
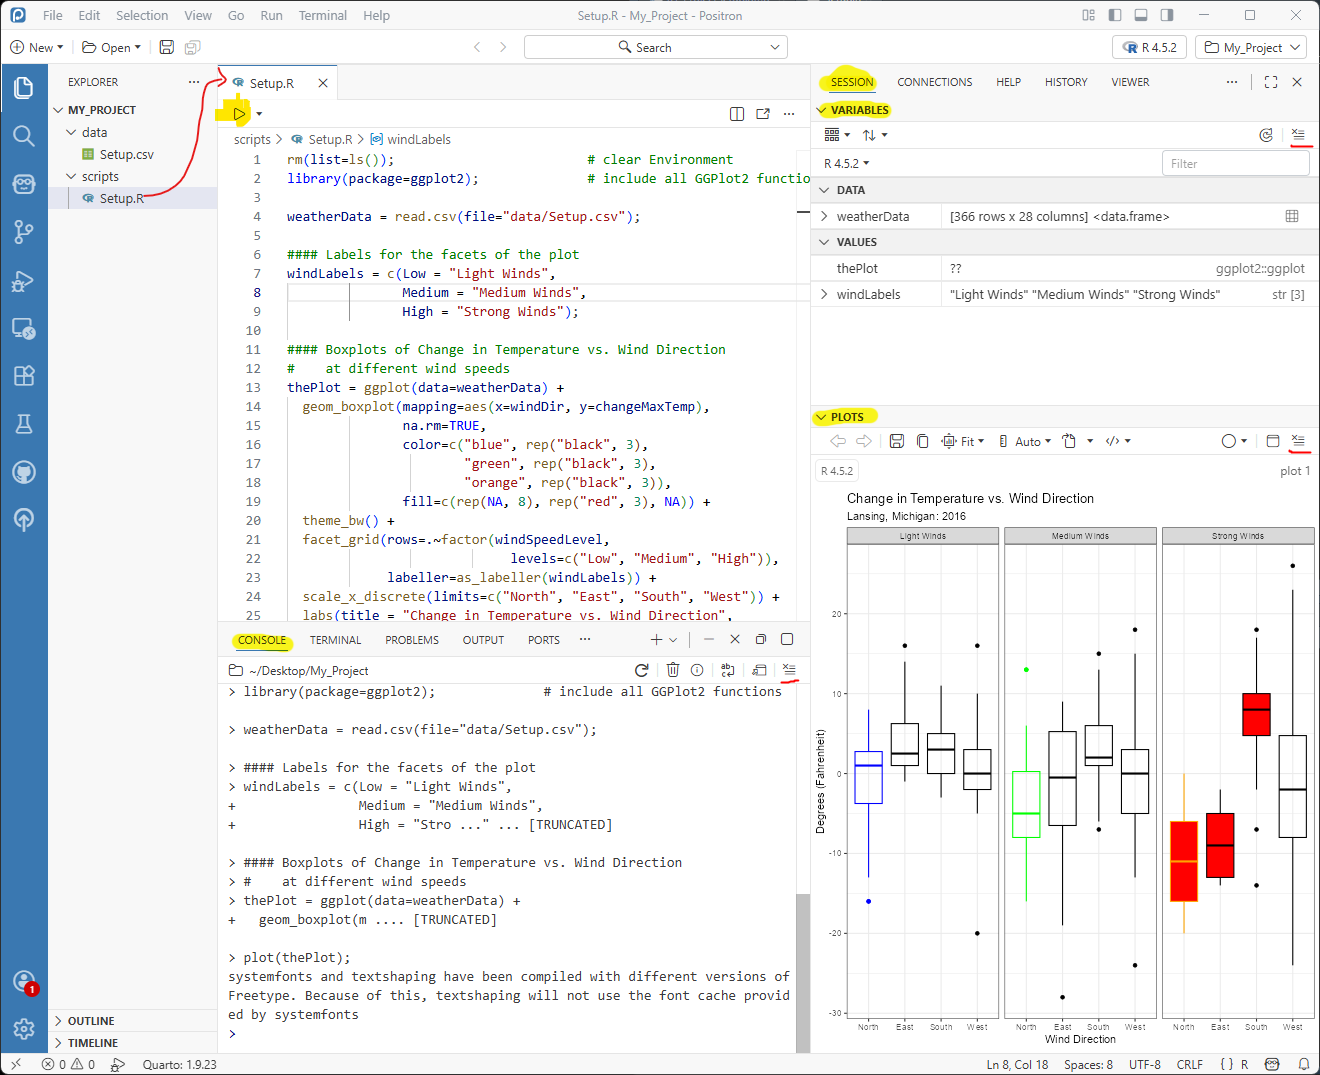
To execute, or Source, the entire script click on the right arrow.
After the script is sourced:
The Console tab displays information about the execution of the script.
The Session tab displays information generated from the execution of the script including Variables (e.g., weatherData, windLabels) and Plots
- Sessions -> Variables is often called the Environment
8.3 Cleaning up the Positron panes
There many times where you want to clean up the panes, which can get very crowded with information from old script executions.
- To clean the Console, Variables, and Plot panes, use the X button (underlined in Figure 8).
If you click Source again, the panes will once again be populated with data from the script’s execution.
9 Saving your Project Folder to GitHub
We are going to save you project folder on GitHub so that it can be shared with the instructor. To complete this section, you need to have a GitHub account.
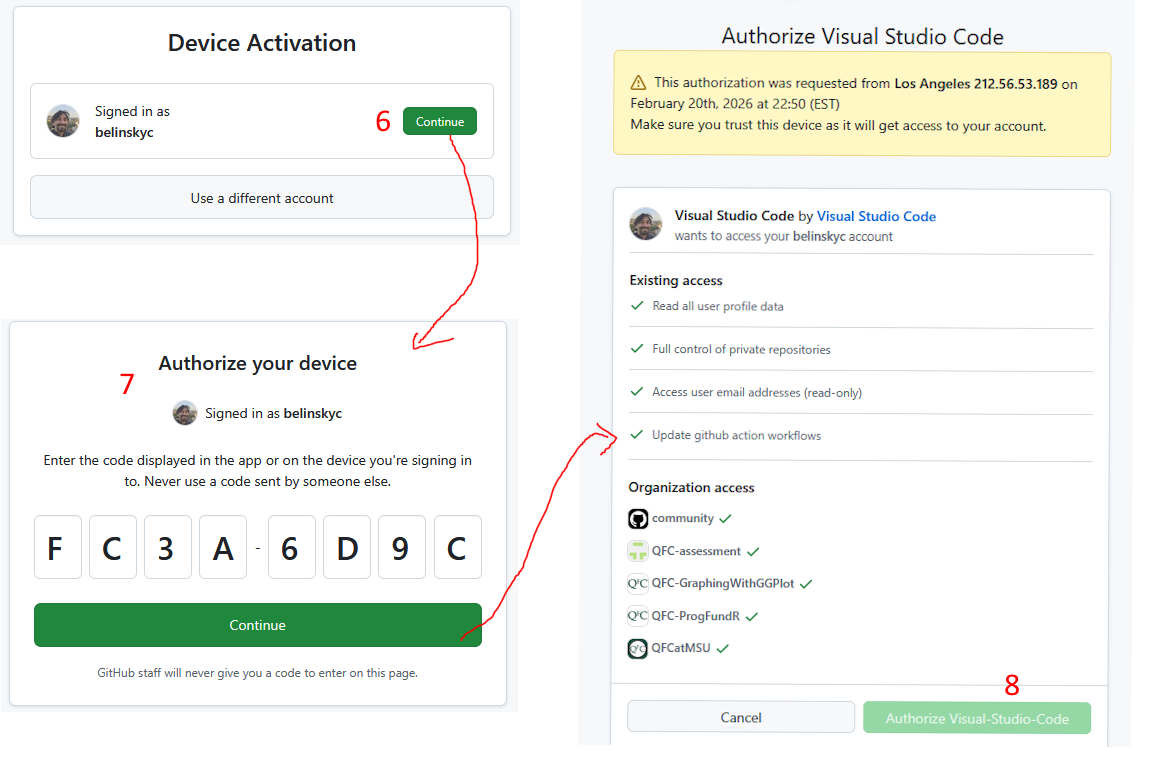
Steps 4-9 are only needed the first time you publish a project to GitHub on a computer because GitHub needs to authenticate your computer and your ID.
9.1 Upload your project to GitHub
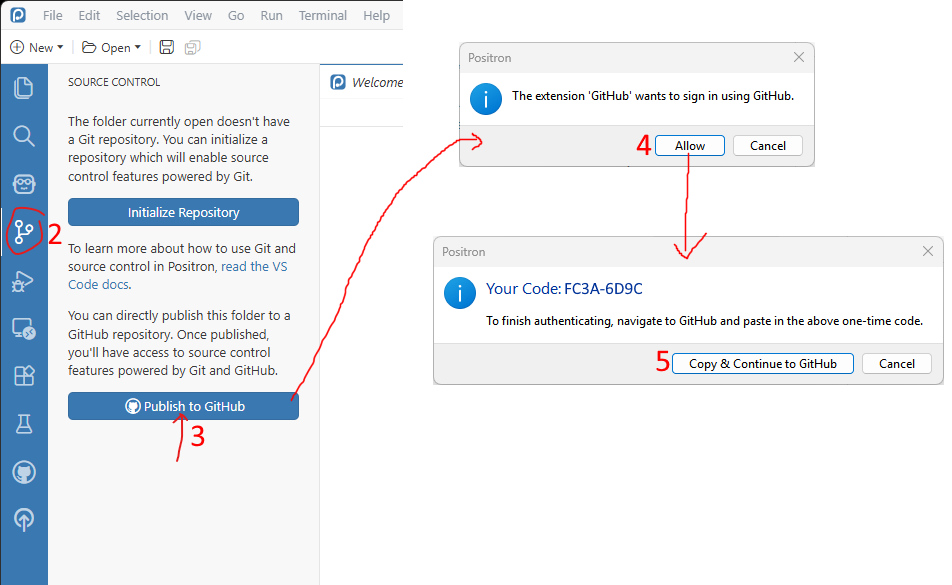
In Positron (Figure 9)
Make sure everything is saved
Click on the Source Control button on the left-vertical bar in Positron (circled in Figure 9)
Click Publish to GitHub
Click Allow so that the extension can sign in to GitHub
You will get a code to use on GitHub, click Copy & Continue to GitHub
On GitHub (Figure 10):
You will have to log in to GitHub and click Continue for Device Activation
Paste the code to authorize the device and click Continue
And then click Authorize Visual-Studio Code (note: Positron is based on VSCode)
A message should appear that you have successfully connected your device – go back to Positron
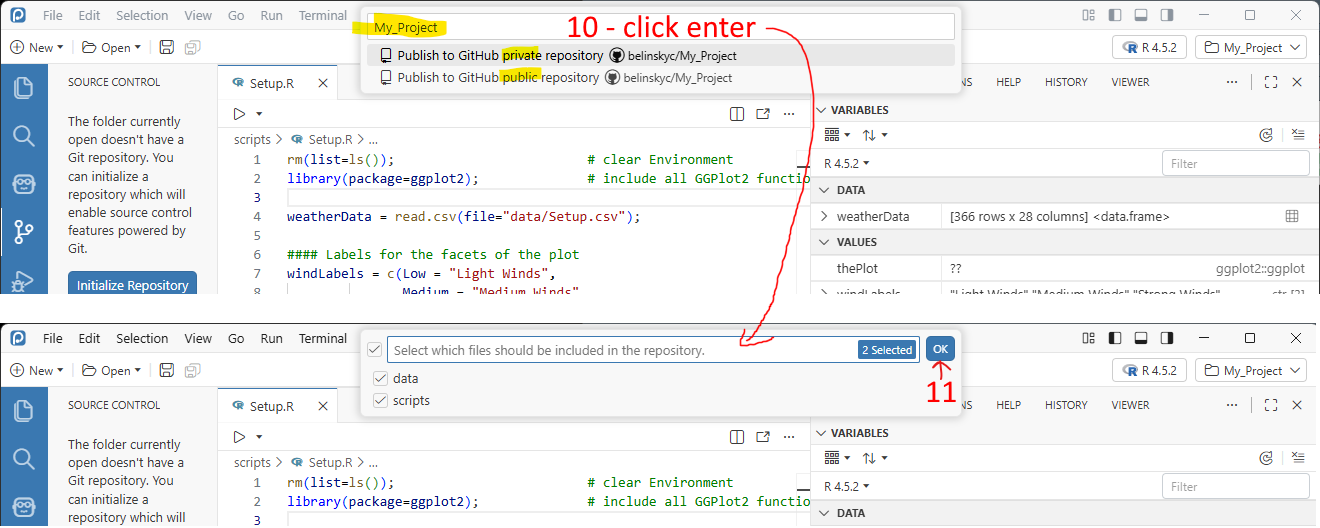
Back in Positron (Figure 11):
In the top text box, choose to publish the project publicly or privately (for this class it does not matter) and click enter
Make sure all files are selected (default) and click OK
In the bottom-right corner of Positron, you will get a pop-up asking if you want Positron to run git fetch every once in a while – it is better to say no (but not a big deal)
10 View project on GitHub
Your project folder is now on GitHub in a repository. Let’s go to your GitHub account to verify that the project files are there (Figure 12):
Log in to GitHub
On the left side, there is a section called Repositories.
Click on the repository called <your-user-name>/<your-repository-name>
Choose the Code tab (you are probably already on it)
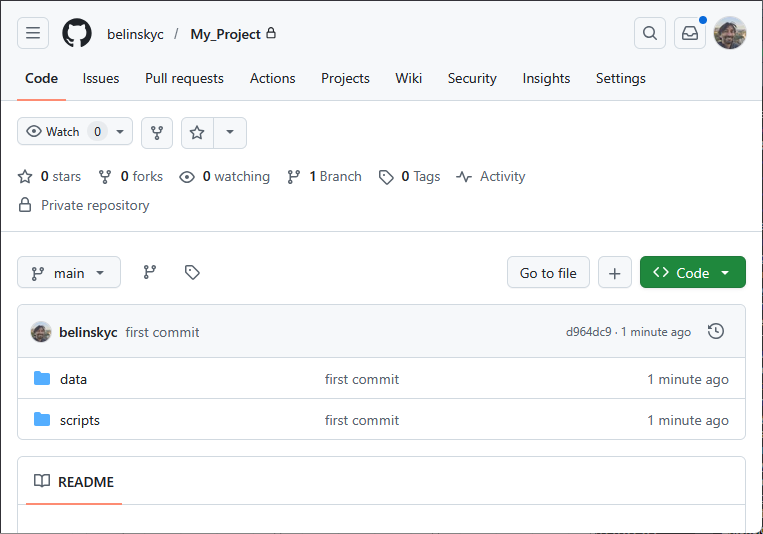
From here you can click on the script and data folders to see what is in them. For this class, we are not going to be using the online repository for anything except storage.
10.1 Inviting the instructor to your repository
Lastly, you need to give the instructor access to the repository.
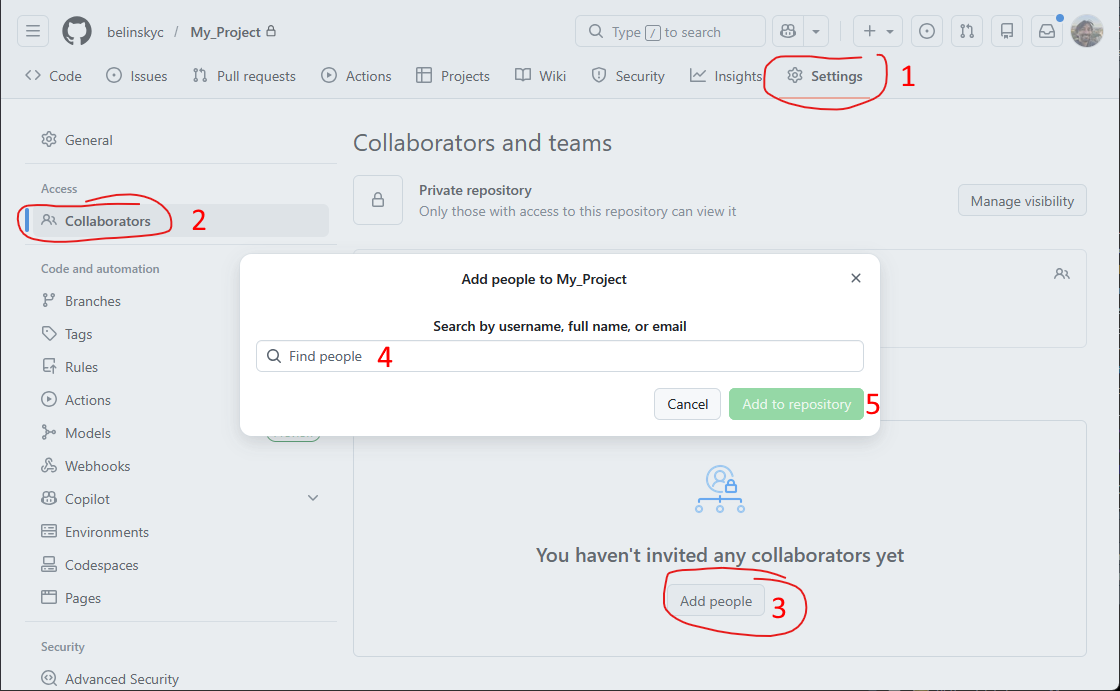
To invite a user (or, as GitHub calls them, collaborator) to your repository:
Go to the GitHub home page for your repository and click Settings
Click Collaborators
Click Add people
In Find people textbox, you can use either the person’s GitHub ID or their email
- invite your instructor: belinsky@msu.edu
Click Add to repository
11 Application
This process is easier if the Explorer tab is open (e.g., Figure 6)
In your Project Folder, create a new script file (File -> New File -> R File R )
Copy and paste this lesson’s script, Setup.r, to the new script.
Change the colors in the boxplot (lines 16-19)
- Here is a comprehensive list of color names you can use in R
Save the script to your script folder as app01.r
If you have any questions regarding this application, feel free to email them to Charlie Belinsky at belinsky@msu.edu.
11.1 Questions to answer
Answer the following in comments inside your application script:
What was your level of comfort with the lesson/application?
What areas of the lesson/application confused or still confuses you?
What are some things you would like to know more about that is related to, but not covered in, this lesson?
11.2 Upload changes to GitHub
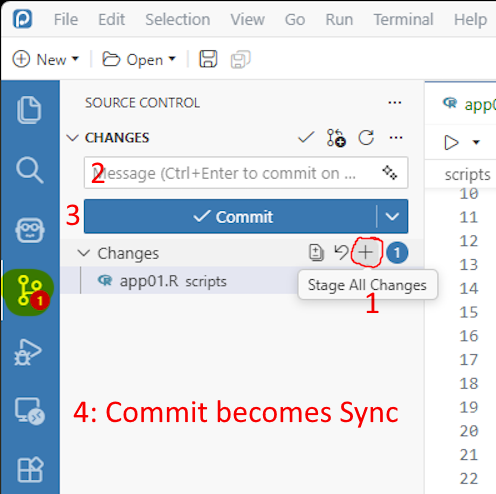
In Source Control tab, under Changes click ( + ): Stage All Changes
- All changed files will now be listed under Staged Changes
Add a message “App1-01 finished”
Click Commit
The Commit button will become a Sync button, click Sync
Email belinsky@msu.edu with the message that application 1-01 is finished OR Extension: Create an issue in GitHub
12 Extension: Create an issue in GitHub
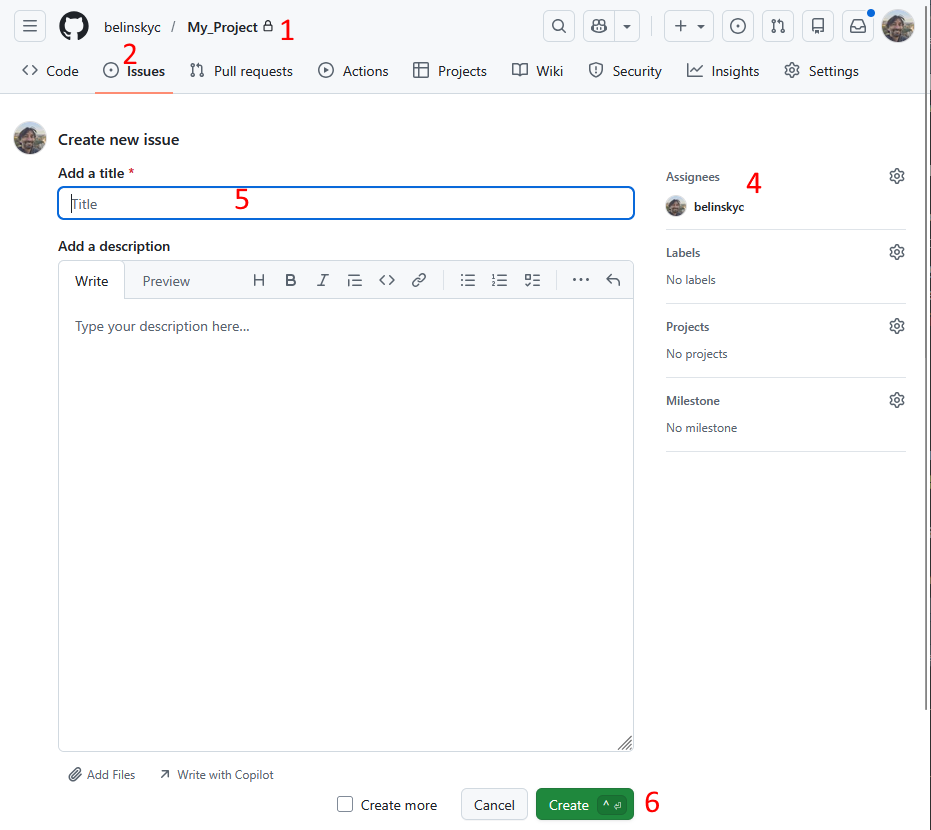
Go to your project folder (repository) on GitHub
Click on Issues (top of page)
Click on New Issue (green button – not pictured)
Click on Setting wheel and add the instructor as an assignee (belinskyc)
Put in title that the application 1-01 is finished, add anything you want to the description
Click Create
13 Extension: Working directories in R
In R, the working directory is the default folder where R looks for files. For example, you might see a line like this in a script:
weatherData = read.csv(file="data/weatherData.csv")Here, R will look for the file weatherData.csv inside a folder named data that is located in the current working directory. How R determines the working directory is not intuitive—it could be your R installation folder, the folder where the script was last run, or some other default depending on your setup. To work around this, many people used an absolute path or setwd() to change the working directory, like this:
# Using an absolute path
weatherData = read.csv(file="C:/Users/YourName/Documents/WeatherProject/data/weatherData.csv")

# Or changing the working directory first
setwd("C:/Users/YourName/Documents/WeatherProject")
weatherData = read.csv(file="data/weatherData.csv")
While these approaches work immediately, they are not portable. If the script is shared or moved, the path will not exist, and the script will fail.
Modern tools like Positron solve this problem with project folders. When you open a project, Positron automatically sets the project folder as the working directory. In this setup, your script can simply use the relative path data/weatherData.csv without worrying about absolute paths. This keeps your code portable and self-contained—you can move or share the project folder, and the script will still work.
14 Extension: Run vs. Source
The difference between Run and Source is:
Source will execute all the code in a script file.
Run will execute either:
The code that is highlighted (if code is highlighted) OR
The command that the cursor is on (if the command is on more than one line) OR
The whole line the cursor is on
As R has grown, the focus has shifted towards developing well-structured code just like any modern programming language (e.g., Python, C, Java). This means executing the script as a whole instead of in parts. This is what Source does. Executing your script as a whole instead of in parts has many advantages as the code is easier to debug, easier to share, and much better organized – because you are forced to organize it. In the not-so-humble opinion of this author, learning to treat your script as a whole is a vital part of learning how to program. For this reason, we will mostly be using Source in this class.
15 Extension: Create a standalone R script
There are two ways to create script file in Positron:
A standalone script
As part of an Project Folder
Many people use the first method. In this class we exclusively use the second method. The first method of creating a script file is fine for testing something out. The second method is far better for organizing larger projects and sharing your code with others.
The reason the second method is better is because a project consist of many file that need to talk each-other. Script files will call other scripts file or read in data from data files. In order to makes this work, the script files need to know how to find the other files. In a Project Folder, this is easy because the working directory is always the Project Folder – and all files in the project are contained within the Project Folder. So, you just need to look for the file relative to the Project Folder.
R Programmers often get around the lack of a Project Folder/defined working directory by setting the working directory in code using setwd(). This can work locally but becomes problematic when files are shared or moved. Whereas, Project Folders always maintain their folder structure.
17 Extension: Positron R Package Manager Extension
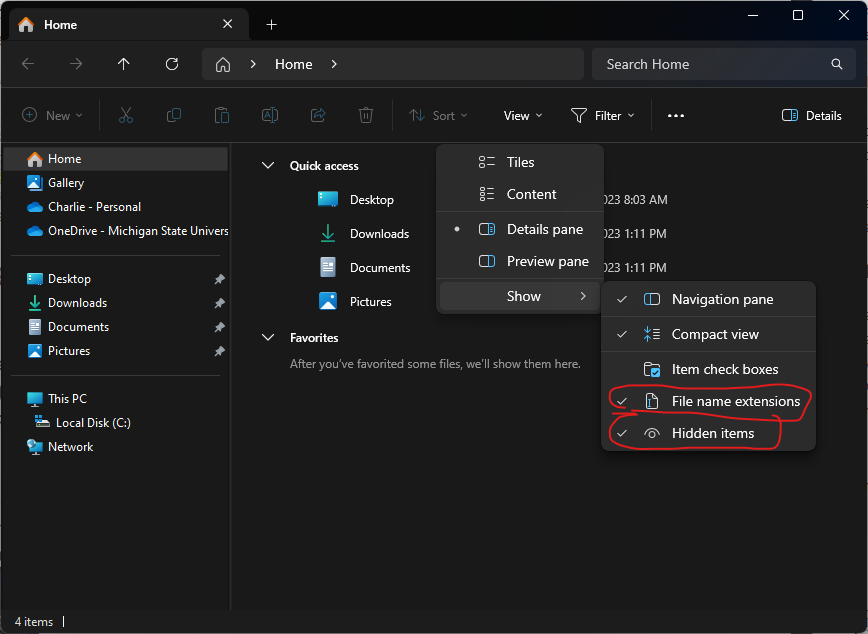
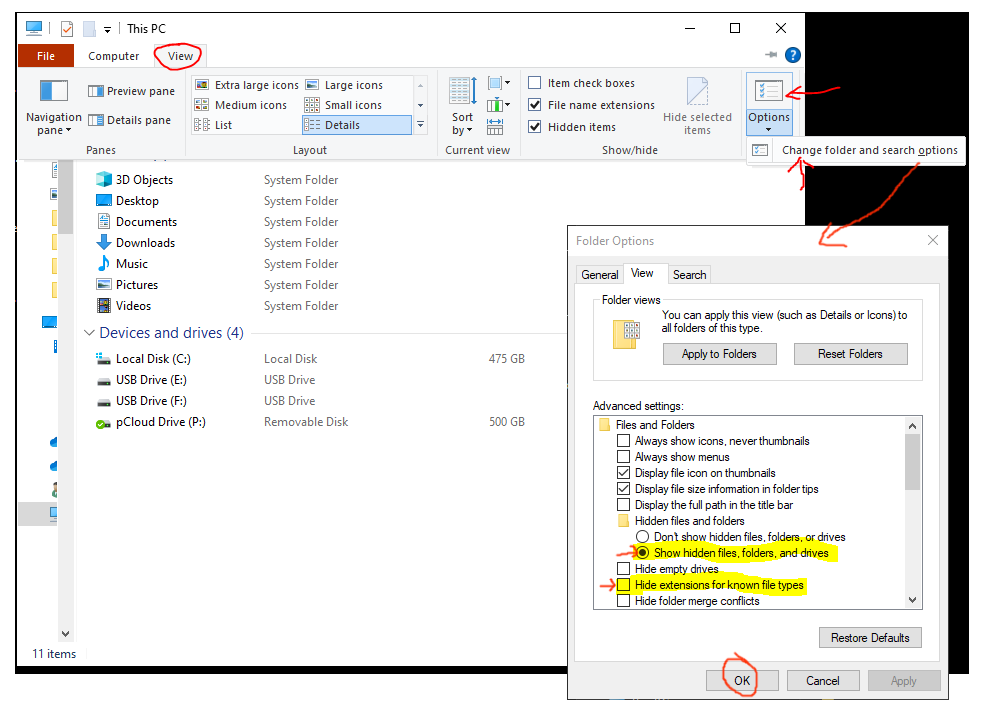
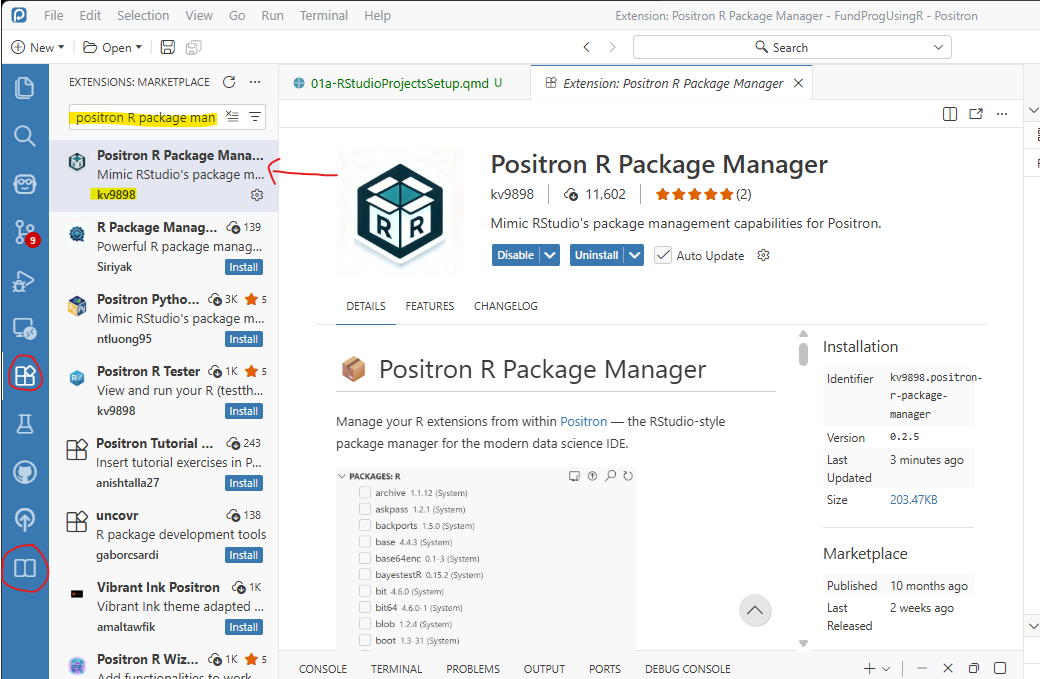
There is an extension for Positron that replicates most of the features of the Package Manager in RStudio. You can install Positron extensions by clicking the 5th button down in the vertical bar on the left (circled). After installation, a new icon will appear at the bottom of the vertical bar (circled) – this is the package manager. Make sure you are installing the version by user kv9898.
This package is very useful but in a quick development cycle, which is why I am not officially including it in the class.
18 Extension: Positron slow to load in Windows
Positron can be slow to load the R Console after computer restarts or the computer has been on a while. On my Windows this was because Windows Defender (antivirus) scan issue. You need to exclude these folders:
- c:\Program Files\R
- c:\Users\<username>\AppData\Local\Programs\Positron
19 Extension: Differences between Positron and RStudio
Some notable difference between RStudio and Positron. This will eventual become a new document.
Default Source
Positron: includes echo (i.e., code prints to Console)
RStudio: no echo
Working directories / Project Folders:
Positron opens folders and sets working directory to the folder
RStudio open *.Rproj files and sets working directory to the folder that contains the RProj file
- note: the Rproj file does nothing in Positron – it can be kept in the project folder
Shortcuts (on Mac: substitute Command for Control)
Duplicate Line
RStudio: Control-Shift-D
Positron: Shift-Alt-DownArrow or Shift-Alt-UpArrow
Toggle line comments
RStudio: Control-Shift-C
Positron: Control-/
Run command, line, or selection: Control-Enter (both)
What R calls the Environment, Positron calls the Session and includes Plots within